# Arduino
# Arduino's overview
### Entry-Level Boards
1. #### Arduino UNO R4 Minima
- **Price**: ~$20
- **Main Purpose**: Beginner-friendly board for learning electronics and programming.
- **Capabilities**: HID support (keyboard/mouse emulation), no built-in Wi-Fi or Bluetooth.
- **Memory**: 32 KB SRAM, 256 KB Flash, 8 KB EEPROM.
2. #### Arduino UNO R4 WiFi
- **Price**: ~$27
- **Main Purpose**: Enhanced UNO for IoT and creative projects with wireless features.
- **Capabilities**: Wi-Fi, Bluetooth (via ESP32-S3), HID support, 12x8 LED matrix, Qwiic connector.
- **Memory**: 32 KB SRAM (RA4M1), 512 KB SRAM (ESP32-S3), 256 KB Flash (RA4M1).
3. #### Arduino Nano Every
- **Price**: ~$13
- **Main Purpose**: Compact, affordable board for small projects and prototyping.
- **Capabilities**: No Wi-Fi or Bluetooth, no HID support natively.
- **Memory**: 6 KB SRAM, 48 KB Flash.
4. #### Arduino Leonardo
- **Price**: ~$25
- **Main Purpose**: USB-focused projects and HID applications.
- **Capabilities**: Native USB communication, HID support (can act as keyboard/mouse), no Wi-Fi or Bluetooth.
- **Memory**: 2.5 KB SRAM, 32 KB Flash, 1 KB EEPROM
---
### Enhanced Boards
4. #### Arduino Mega 2560 Rev3
- **Price**: ~$48
- **Main Purpose**: Advanced projects needing many I/O pins and higher memory.
- **Capabilities**: No Wi-Fi or Bluetooth, no HID support natively, 54 digital I/O pins.
- **Memory**: 8 KB SRAM, 256 KB Flash, 4 KB EEPROM.
5. #### Arduino Due
- **Price**: ~$45
- **Main Purpose**: High-performance projects requiring 32-bit processing.
- **Capabilities**: No Wi-Fi or Bluetooth, HID support, DAC for analog output.
- **Memory**: 96 KB SRAM, 512 KB Flash.
---
### IoT-Focused Boards
6. #### Arduino Nano 33 IoT
- **Price**: ~$25
- **Main Purpose**: Small IoT projects with wireless connectivity.
- **Capabilities**: Wi-Fi, Bluetooth, HID support, onboard crypto chip.
- **Memory**: 32 KB SRAM, 256 KB Flash.
7. #### Arduino Nano 33 BLE
- **Price**: ~$28
- **Main Purpose**: IoT and wearable projects with Bluetooth focus.
- **Capabilities**: Bluetooth Low Energy (BLE), HID support, no Wi-Fi, onboard IMU.
- **Memory**: 256 KB SRAM, 1 MB Flash.
8. #### Arduino Nano ESP32
- **Price**: ~$20
- **Main Purpose**: Compact IoT with high-performance ESP32 capabilities.
- **Capabilities**: Wi-Fi, Bluetooth, HID support, MicroPython support.
- **Memory**: 520 KB SRAM, 16 MB Flash (external).
9. #### Arduino MKR WiFi 1010
- **Price**: ~$40
- **Main Purpose**: IoT projects with secure wireless communication.
- **Capabilities**: Wi-Fi, Bluetooth, HID support, onboard crypto chip.
- **Memory**: 32 KB SRAM, 256 KB Flash.
10. #### Arduino GIGA R1 WiFi
- **Price**: ~$75
- **Main Purpose**: Advanced, large-scale projects with multimedia and connectivity.
- **Capabilities**: Wi-Fi, Bluetooth, HID support, dual-core MCU, camera/display support.
- **Memory**: 576 KB SRAM (M7 core) + 256 KB (M4 core), 2 MB Flash.
11. #### Arduino Portenta H7
- **Price**: ~$110
- **Main Purpose**: Industrial-grade, high-performance IoT and AI applications.
- **Capabilities**: Wi-Fi, Bluetooth, HID support, dual-core MCU, high-speed I/O.
- **Memory**: 2 MB SRAM (total), 16 MB Flash (external).
# Temperatuur en luchtvochtigheid
### Temperatuur en luchtvochtigheid
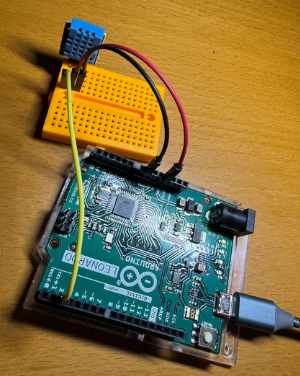
### DHT11
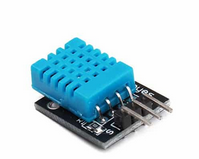
DHT11; van links naar rechts: *signaal* (naar port 2), *3.3V, GRND*.
Let op er zijn meerdere varianten en bij de meeste zit de data in het midden.
([https://elektronicavoorjou.nl/product/dht11-temperatuur-en-vochtigheid-sensor/](https://elektronicavoorjou.nl/product/dht11-temperatuur-en-vochtigheid-sensor/))
### Output
```
1
Temperature: 20.5 °C
Humidity: 45 %
2
Temperature: 20.5 °C
Humidity: 45 %
...
```
### Code
```c
#include
#define DHTPIN 2 // Pin connected to the DHT11 data pin
#define DHTTYPE DHT11 // Specify DHT11 sensor
DHT dht(DHTPIN, DHTTYPE);
int count;
void setup() {
Serial.begin(9600);
dht.begin();
count = 0;
delay(5000);
}
void loop() {
count++;
delay(2000); // Wait 2 seconds between readings (DHT11 needs time)
float temp = dht.readTemperature(); // Read temperature as a float
int humidity = dht.readHumidity();
if (isnan(temp)) {
Serial.println("Failed to read from DHT sensor!");
} else {
Serial.println(count);
Serial.print("Temperature: ");
Serial.print(temp, 1);
Serial.println(" °C");
Serial.print("Humidity: ");
Serial.print(humidity);
Serial.println(" %");
Serial.println("");
}
}
```
# Display
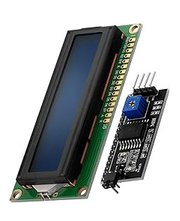
#### 1602 LCD Module Display Bundle with I2C interface 2x16 Characters
### Aansluitschema
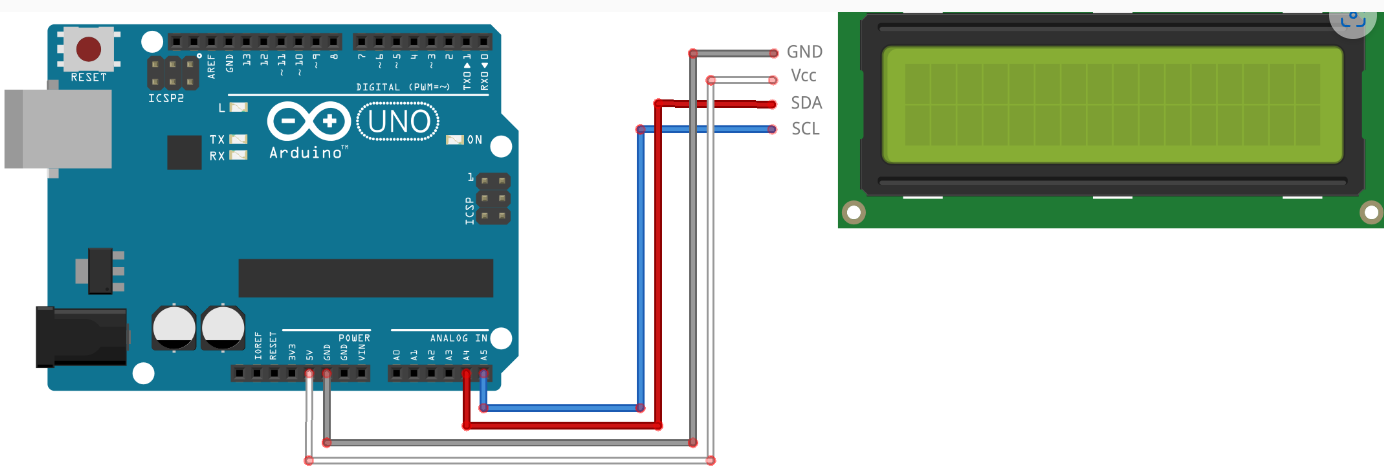
Let op: de pin configuratie verschilt per type Arduino
| Uno, Ethernet | A4 (SDA), A5 (SCL) |
| Mega2560 | 20 (SDA), 21 (SCL) |
| Leonardo | 2 (SDA), 3 (SCL) |
| Due | 20 (SDA), 21 (SCL) of SDA1, SCL1 |
### Links
Arduino Lessen: [https://arduino-lessen.nl/](https://arduino-lessen.nl/)
EBook: [https://azde.ly/TF12MBFS](https://cdn.shopify.com/s/files/1/1509/1638/files/AZ168_B25-7_EN_B07CQG6CMT_cca9d5d8-90ba-4113-b160-4b4c82d2ca66.pdf?v=1721121160)
Voorbeeld code: [Arduino-Beginners-NL/E11-I2C-LCD/i2c-lcd-deel-1.ino at master · BasOnTech/Arduino-Beginners-NL · GitHub](https://github.com/BasOnTech/Arduino-Beginners-NL/blob/master/E11-I2C-LCD/i2c-lcd-deel-1.ino)
# Thermometer bewegingsmelder en clock
### Thermometer bewegingsmelder en clock
Het display laat de temperatuur en luchtvochtigheid zien en toont de trend met een pijltje omhoog of naar beneden.
Op de tweede regel staat de datum en tijd.
Het display gaat alleen 'aan' als er beweiging wordt geconstateerd.
Gemeten stroom is ongeveer 40 mA voor de gehele schakeling.
[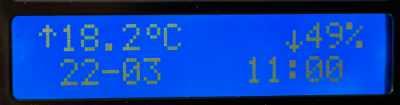](https://www.roc.ovh/uploads/images/gallery/2025-03/screenshot-2025-03-22-110222.jpg)
### Aansuitschema
#### *PIR Bewegingsmelder*
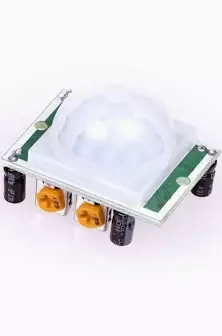
Van onder gezien van links naar rechts
(Let op er zijn verschillende pin configuraties. Verwijder lans/cap om de pin configuratie te zien).
- Plus 5V
- Signaal naar Pin 12 Arduino Leonarde.
- Min
Signaal naar Digitaal pin 12 Arduono Leonarde
#### *Clock DS 3231*
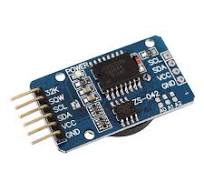
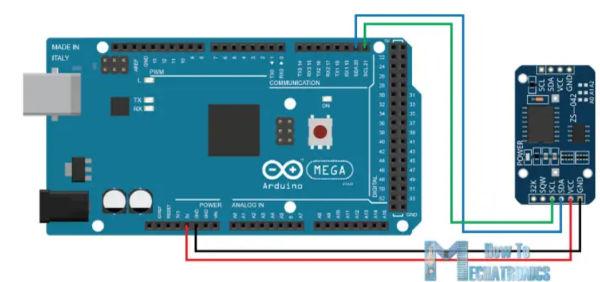
[http://www.rinkydinkelectronics.com/library.php?id=73](http://www.rinkydinkelectronics.com/library.php?id=73)
Van links naar rechts van onderkant (niet batterij kant) gezien en *laatste* 4 pootjes.
- SCL naar SCL op Arduino (op Leonarde meest rechter pin)
- SDA naar SDA op Arduino (op Leonarde op een na meest rechter pin)
- Plus 3.3V
- Min
#### *Thermometer*
**
Van links naar rechts (gaatjes van blauwe blokje boven).
- naar pin 4 Arduino Leonarde
- Plus 3.3V
- Min
Zie [https://www.roc.ovh/books/arduino/page/temperatuur-en-luchtvochtigheid](https://www.roc.ovh/books/arduino/page/temperatuur-en-luchtvochtigheid)
#### *Display*

Zie [https://www.roc.ovh/books/arduino/page/display](https://www.roc.ovh/books/arduino/page/display)
### Code
```c++
#include
#include
#include
#include
#define DHTPIN 4 // Pin connected to the DHT11 data pin
#define DHTTYPE DHT11 // Specify DHT11 sensor
#define SIGNAL_INTERVAL 600000 // 10 minutes
DHT dht(DHTPIN, DHTTYPE);
DS3231 myRTC;
bool century = false;
bool h12Flag;
bool pmFlag;
int count = 0;
int pirPin = 12; // Pin for the HC-S501 sensor
int pirValue;
LiquidCrystal_I2C lcd = LiquidCrystal_I2C(0x27, 16, 2);
unsigned long previousMillis = 0;
const long dhtInterval = 2000; // Interval for DHT readings
// Custom characters for the LCD arrows
byte downChar[] = {
B00000,
B00000,
B00100,
B00100,
B00100,
B10101,
B01110,
B00100
};
byte upChar[] = {
B00100,
B01110,
B10101,
B00100,
B00100,
B00100,
B00000,
B00000
};
byte degreeChar[] = {
B00110,
B01001,
B01001,
B00110,
B00000,
B00000,
B00000,
B00000
};
//------------------------------------------------------------------------------
// Generic MeasurementSensor Class Template
//------------------------------------------------------------------------------
template
class MeasurementSensor {
private:
T measurement; // Current measurement value
int arrow; // Arrow indicator: 0 = no arrow, 1 = down, 2 = up
unsigned long arrowMillis; // Last time the arrow was updated/reset
const long signalInterval; // Time interval to reset the arrow
public:
// Constructor: initializes with an initial measurement value.
MeasurementSensor(long sigInterval, T initValue)
: measurement(initValue), arrow(0), arrowMillis(0), signalInterval(sigInterval) {}
// Update the measurement reading and determine the arrow indicator
void update(T newMeasurement, unsigned long currentMillis) {
// If the new measurement equals the previous value and the signal interval has passed, reset arrow.
if (newMeasurement == measurement && currentMillis - arrowMillis >= signalInterval) {
arrow = 0;
} else {
if (newMeasurement > measurement) {
arrow = 2; // Up arrow
arrowMillis = currentMillis;
}
if (newMeasurement < measurement) {
arrow = 1; // Down arrow
arrowMillis = currentMillis;
}
}
// If the previous value is the initial invalid value, clear the arrow indicator.
if (measurement == static_cast(-99)) {
arrow = 0;
}
measurement = newMeasurement;
}
// Getters for measurement and arrow
T getMeasurement() const { return measurement; }
int getArrow() const { return arrow; }
};
//------------------------------------------------------------------------------
// Global Instances for Temperature and Humidity
//------------------------------------------------------------------------------
MeasurementSensor tempSensor(SIGNAL_INTERVAL, -99.0);
MeasurementSensor humiditySensor(SIGNAL_INTERVAL, -99);
void setup() {
Serial.begin(9600);
dht.begin();
delay(2000);
lcd.init();
lcd.backlight();
lcd.clear();
lcd.createChar(1, downChar);
lcd.createChar(2, upChar);
lcd.createChar(3, degreeChar);
pinMode(pirPin, INPUT);
// myRTC.setYear(2025);
// myRTC.setMonth(3);
// myRTC.setDate(20);
// myRTC.setHour(23);
// myRTC.setMinute(49);
// myRTC.setSecond(0);
}
void print2digits(int number) {
if (number < 10) {
lcd.print("0");
}
lcd.print(number, DEC);
}
void loop() {
delay(20);
// lcd.print(":");
// print2digits(myRTC.getSecond());
// Check for movement
pirValue = digitalRead(pirPin);
if (pirValue) {
lcd.backlight();
}
// Do we need to update the display?
unsigned long currentMillis = millis();
if (currentMillis - previousMillis >= dhtInterval) {
previousMillis = currentMillis;
// Update backlight based on PIR sensor
pirValue = digitalRead(pirPin);
if (!pirValue) {
lcd.noBacklight();
}
count++;
// Read new values from the DHT sensor
float newTemperature = dht.readTemperature();
int newHumidity = dht.readHumidity();
if (isnan(newTemperature) || isnan(newHumidity)) {
Serial.println("Failed to read from DHT sensor!");
return;
}
// Update our measurement sensors
tempSensor.update(newTemperature, currentMillis);
humiditySensor.update(newHumidity, currentMillis);
// Print sensor readings to the Serial Monitor
Serial.print(count);
Serial.print(", Temperature: ");
Serial.print(tempSensor.getMeasurement(), 1);
Serial.print("°C");
Serial.print(", Humidity: ");
Serial.print(humiditySensor.getMeasurement());
Serial.print("%");
Serial.println("");
Serial.println(myRTC.getSecond(), DEC);
Serial.println("");
// Update the LCD display for temperature
lcd.setCursor(0, 0);
if (tempSensor.getArrow()) {
lcd.write(tempSensor.getArrow());
} else {
lcd.print(" ");
}
lcd.print(tempSensor.getMeasurement(), 1);
lcd.write(3); // degree symbol
lcd.print("C ");
// Update the LCD display for humidity (set cursor on second row)
lcd.setCursor(12, 0);
if (humiditySensor.getArrow()) {
lcd.write(humiditySensor.getArrow());
} else {
lcd.print(" ");
}
lcd.print(humiditySensor.getMeasurement());
lcd.print("%");
lcd.setCursor(1, 1);
print2digits(myRTC.getDate());
lcd.print("-");
print2digits(myRTC.getMonth(century));
lcd.setCursor(10, 1);
print2digits(myRTC.getHour(h12Flag, pmFlag));
lcd.print(":");
print2digits(myRTC.getMinute());
}
}
```
##### Code met higest/lowest
```c++
#include
#include
#include
#include
#define DHTPIN 4 // Pin connected to the DHT11 data pin
#define DHTTYPE DHT11 // Specify DHT11 sensor
#define SIGNAL_INTERVAL 600000 // 10 minutes
DHT dht(DHTPIN, DHTTYPE);
DS3231 myRTC;
bool century = false;
bool h12Flag;
bool pmFlag;
int count = 0;
int pirPin = 12; // Pin for the HC-S501 sensor
int pirValue;
LiquidCrystal_I2C lcd = LiquidCrystal_I2C(0x27, 16, 2);
unsigned long previousMillis = 0;
const long dhtInterval = 2000; // Interval for DHT readings
// Custom characters for the LCD arrows
byte downChar[] = {
B00000,
B00000,
B00100,
B00100,
B00100,
B10101,
B01110,
B00100
};
byte upChar[] = {
B00100,
B01110,
B10101,
B00100,
B00100,
B00100,
B00000,
B00000
};
byte degreeChar[] = {
B00110,
B01001,
B01001,
B00110,
B00000,
B00000,
B00000,
B00000
};
//------------------------------------------------------------------------------
// Generic MeasurementSensor Class Template
//------------------------------------------------------------------------------
template
class MeasurementSensor {
private:
T measurement; // Current measurement value
T lowestMeasurement;
T highestMeasurement;
int arrow; // Arrow indicator: 0 = no arrow, 1 = down, 2 = up
unsigned long arrowMillis; // Last time the arrow was updated/reset
const long signalInterval; // Time interval to reset the arrow
public:
// Constructor: initializes with an initial measurement value.
MeasurementSensor(long sigInterval, T initValue)
: measurement(initValue), arrow(0), arrowMillis(0), lowestMeasurement(0), highestMeasurement(0), signalInterval(sigInterval) {}
// Update the measurement reading and determine the arrow indicator
void update(T newMeasurement, unsigned long currentMillis) {
// If this is the first valid measurement, initialize min/max
if (lowestMeasurement == static_cast(0) && highestMeasurement == static_cast(0)) {
lowestMeasurement = newMeasurement;
highestMeasurement = newMeasurement;
}
// Determine highest and lowest
if (newMeasurement < lowestMeasurement) {
lowestMeasurement = newMeasurement;
}
if (newMeasurement > highestMeasurement) {
highestMeasurement = newMeasurement;
}
// If the new measurement equals the previous value and the signal interval has passed, reset arrow.
if (newMeasurement == measurement && currentMillis - arrowMillis >= signalInterval) {
arrow = 0;
} else {
if (newMeasurement > measurement) {
arrow = 2; // Up arrow
arrowMillis = currentMillis;
}
if (newMeasurement < measurement) {
arrow = 1; // Down arrow
arrowMillis = currentMillis;
}
}
// If the previous value is the initial invalid value, clear the arrow indicator.
if (measurement == static_cast(-99)) {
arrow = 0;
}
measurement = newMeasurement;
}
// Getters for measurement and arrow
T getMeasurement() const {
return measurement;
}
T getLowest() const {
return lowestMeasurement;
}
T getHighest() const {
return highestMeasurement;
}
int getArrow() const {
return arrow;
}
void resetMinMax(T currentValue) {
lowestMeasurement = currentValue;
highestMeasurement = currentValue;
}
};
//------------------------------------------------------------------------------
// Global Instances for Temperature and Humidity
//------------------------------------------------------------------------------
MeasurementSensor tempSensor(SIGNAL_INTERVAL, -99.0);
MeasurementSensor humiditySensor(SIGNAL_INTERVAL, -99);
void setup() {
Serial.begin(9600);
dht.begin();
delay(2000);
lcd.init();
lcd.backlight();
lcd.clear();
lcd.createChar(1, downChar);
lcd.createChar(2, upChar);
lcd.createChar(3, degreeChar);
pinMode(pirPin, INPUT);
// myRTC.setYear(2025);
// myRTC.setMonth(3);
// myRTC.setDate(20);
// myRTC.setHour(10);
// myRTC.setMinute(49);
// myRTC.setSecond(0);
}
void print2digits(int number) {
if (number < 10) {
lcd.print("0");
}
lcd.print(number, DEC);
}
int lastResetHour = -1; // Initialize to an invalid hour
void loop() {
delay(20);
// lcd.print(":");
// print2digits(myRTC.getSecond());
// Check for movement
pirValue = digitalRead(pirPin);
if (pirValue) {
lcd.backlight();
}
// Do we need to update the display?
unsigned long currentMillis = millis();
if (currentMillis - previousMillis >= dhtInterval) {
previousMillis = currentMillis;
// Update backlight based on PIR sensor
pirValue = digitalRead(pirPin);
if (!pirValue) {
lcd.noBacklight();
}
count++;
// Read new values from the DHT sensor
float newTemperature = dht.readTemperature();
int newHumidity = dht.readHumidity();
if (isnan(newTemperature) || isnan(newHumidity)) {
Serial.println("Failed to read from DHT sensor!");
return;
}
// Get current hour from RTC
int currentHour = myRTC.getHour(h12Flag, pmFlag);
// Check if hour has changed
if (currentHour != lastResetHour) {
tempSensor.resetMinMax(newTemperature);
humiditySensor.resetMinMax(newHumidity);
lastResetHour = currentHour;
Serial.println("min/max values reset");
}
// Update our measurement sensors
tempSensor.update(newTemperature, currentMillis);
humiditySensor.update(newHumidity, currentMillis);
// Update the LCD display for temperature
lcd.setCursor(0, 0);
if ( count % 6 ) {
if (tempSensor.getArrow()) {
lcd.write(tempSensor.getArrow());
} else {
lcd.print(" ");
}
lcd.print(tempSensor.getMeasurement(), 1);
lcd.write(3); // degree symbol
lcd.print("C ");
} else {
lcd.print("");
lcd.print(tempSensor.getLowest(),1);
lcd.write(3);
lcd.print(" ");
lcd.print(tempSensor.getHighest(),1);
lcd.write(3);
lcd.print(" ");
}
// Update the LCD display for humidity (set cursor on second row)
if (humiditySensor.getArrow()) {
lcd.write(humiditySensor.getArrow());
} else {
lcd.print(" ");
}
lcd.print(humiditySensor.getMeasurement());
lcd.print("%");
lcd.setCursor(1, 1);
print2digits(myRTC.getDate());
lcd.print("-");
print2digits(myRTC.getMonth(century));
lcd.setCursor(10, 1);
print2digits(myRTC.getHour(h12Flag, pmFlag));
lcd.print(":");
print2digits(myRTC.getMinute());
}
}
```
\--
# Beweging, Temperatuur Clock en Buttons
Same setup but improved with three buttons to make it completely independed from PC.
```c#
#include
#include
#include
#include
// --- Definitions ---
#define DHTPIN 4 // Pin connected to the DHT11 data pin
#define DHTTYPE DHT11 // Specify DHT11 sensor
#define BUTTON1PIN 8
#define BUTTON2PIN 9
#define BUTTON3PIN 10
#define TREND_DISPLAY_DURATION_MS 600000 // 10 minutes, time to keep the sinal (arrow up/down) in display
#define HISTORICAL_DATA_ENTRIES_COUNT 5 // Define the length of the history (min-max) buffers: so we keep the last N hours of min max data.
#define MAX_HISTORY_STRING_LENGTH 100 // Maximum characters for the history string
#define DEBUG true // Set to true to enable debug printing, false to disable
DHT dht(DHTPIN, DHTTYPE);
DS3231 myRTC;
bool century = false;
bool h12Flag;
bool pmFlag;
int count = 0;
int pirPin = 12; // Pin for the HC-S501 sensor
int pirValue;
LiquidCrystal_I2C lcd = LiquidCrystal_I2C(0x27, 16, 2);
unsigned long previousMillis = 0;
const long dhtInterval = 2000; // Interval for DHT readings
// Custom characters for the LCD arrows
byte downChar[] = {
B00000,
B00000,
B00100,
B00100,
B00100,
B10101,
B01110,
B00100
};
byte upChar[] = {
B00100,
B01110,
B10101,
B00100,
B00100,
B00100,
B00000,
B00000
};
byte degreeChar[] = {
B00110,
B01001,
B01001,
B00110,
B00000,
B00000,
B00000,
B00000
};
byte maxChar[] = {
B01110,
B00000,
B00100,
B01110,
B10101,
B00100,
B00100,
B00100
};
byte minChar[] = {
B00100,
B00100,
B00100,
B10101,
B01110,
B00100,
B00000,
B01110
};
//------------------------------------------------------------------------------
// Generic MeasurementSensor Class Template
//------------------------------------------------------------------------------
template
class MeasurementSensor {
public:
// Constructor: initializes with an initial measurement value and history capacity N.
MeasurementSensor(long sigInterval)
: measurement(0),
arrow(0),
arrowMillis(0),
lowestMeasurement(0),
highestMeasurement(0),
signalInterval(sigInterval),
historyCount(0),
historyIndex(0) {}
// Destructor (no longer needed due to no dynamic memory)
//~MeasurementSensor() {}
// Update the measurement reading and determine the arrow indicator.
void update(T newMeasurement, unsigned long currentMillis) {
// For the first valid measurement, initialize min/max if needed.
if (lowestMeasurement == static_cast(0) && highestMeasurement == static_cast(0)) {
lowestMeasurement = newMeasurement;
highestMeasurement = newMeasurement;
}
// Update the current interval's min and max.
if (newMeasurement < lowestMeasurement) {
lowestMeasurement = newMeasurement;
}
if (newMeasurement > highestMeasurement) {
highestMeasurement = newMeasurement;
}
// Determine arrow indicator logic.
if (newMeasurement == measurement && currentMillis - arrowMillis >= signalInterval) {
arrow = 0;
} else {
if (newMeasurement < measurement) {
arrow = 1; // Down arrow
arrowMillis = currentMillis;
}
if (newMeasurement > measurement) {
arrow = 2; // Up arrow
arrowMillis = currentMillis;
}
if (lowestMeasurement != highestMeasurement) {
if (newMeasurement == this->getLowest()) {
arrow = 4; // Indicator for lowest measurement
arrowMillis = currentMillis;
}
if (newMeasurement == this->getHighest()) {
arrow = 5; // Indicator for highest measurement
arrowMillis = currentMillis;
}
}
}
// Reset arrow if previous value was an invalid initial value.
if (measurement == static_cast(0)) {
arrow = 0;
}
measurement = newMeasurement;
}
// Getters for measurement and arrow.
T getMeasurement() const {
return measurement;
}
// Returns the lowest measurement seen over the history combined with the current interval.
T getLowest() const {
T minVal = lowestMeasurement;
// Loop over the history array.
for (size_t i = 0; i < historyCount; i++) {
if (lowestHistory[i] < minVal) {
minVal = lowestHistory[i];
}
}
return minVal;
}
// Returns the highest measurement seen over the history combined with the current interval.
T getHighest() const {
T maxVal = highestMeasurement;
// Loop over the history array.
for (size_t i = 0; i < historyCount; i++) {
if (highestHistory[i] > maxVal) {
maxVal = highestHistory[i];
}
}
return maxVal;
}
int getArrow() const {
return arrow;
}
// Reset the min and max values.
// The current lowest and highest measurements are stored in the history arrays.
void resetMinMax(T newMeasurement) {
// Store the current min and max in the arrays at the current history index.
lowestHistory[historyIndex] = lowestMeasurement;
highestHistory[historyIndex] = highestMeasurement;
lowestMeasurement = newMeasurement;
highestMeasurement = newMeasurement;
// Increment historyIndex as a circular buffer.
historyIndex = (historyIndex + 1) % HISTORICAL_DATA_ENTRIES_COUNT;
if (historyCount < HISTORICAL_DATA_ENTRIES_COUNT) {
historyCount++;
}
}
void getHistoryString(bool useHighest, char* buffer, size_t bufferSize) const {
// Initialize the buffer to an empty string.
buffer[0] = '\0';
// Determine the index of the oldest element.
size_t oldestIndex = (historyCount < HISTORICAL_DATA_ENTRIES_COUNT) ? 0 : historyIndex;
// Loop over the valid history entries in order.
for (size_t i = 0; i < historyCount; i++) {
size_t index = (oldestIndex + i) % HISTORICAL_DATA_ENTRIES_COUNT;
T value = useHighest ? highestHistory[index] : lowestHistory[index];
// Temporary buffer for the converted float value.
char tempValue[10];
// Convert the float value to a string with width 4 and one decimal point.
dtostrf(static_cast(value), 4, 1, tempValue);
// Check if adding the next value will overflow the main buffer.
size_t remainingSpace = bufferSize - strlen(buffer) - 1;
size_t charsNeeded = strlen(tempValue) + (i < historyCount - 1 ? 2 : 0); // value + ", "
if (charsNeeded > remainingSpace) {
Serial.println("Error: Insufficient buffer space in getHistoryString!");
return; // You may choose to handle this differently.
}
// Concatenate the value to the buffer.
strcat(buffer, tempValue);
// Add the separator if it's not the last element.
if (i < historyCount - 1) {
strcat(buffer, ", ");
}
}
}
private:
T measurement;
int arrow;
unsigned long arrowMillis;
T lowestMeasurement;
T highestMeasurement;
long signalInterval;
// History storage: fixed size arrays
T lowestHistory[HISTORICAL_DATA_ENTRIES_COUNT];
T highestHistory[HISTORICAL_DATA_ENTRIES_COUNT];
size_t historyCount;
size_t historyIndex;
};
class Button {
private:
int pin;
int prevState;
const char* name;
unsigned long pressStartTime;
bool longPressTriggered;
const unsigned long LONG_PRESS_DURATION = 1000; // 1 second for long press
public:
// Constructor: initialize the button pin and its name
Button(int pin, const char* name)
: pin(pin), prevState(LOW), name(name), pressStartTime(0), longPressTriggered(false) {
pinMode(pin, INPUT);
}
// Update the button state and return true if the button was pressed (transition from LOW to HIGH)
bool update() {
int currentState = digitalRead(pin);
bool pressed = false;
if (currentState != prevState) {
// Button state changed
if (currentState == HIGH) {
// Button was just pressed
pressStartTime = millis();
longPressTriggered = false;
} else {
// Button was just released
if ((millis() - pressStartTime < LONG_PRESS_DURATION) && !longPressTriggered) {
// Short press detected
pressed = true;
}
pressStartTime = 0;
}
prevState = currentState;
}
return pressed;
}
// Check for long press and return true if long press is detected
bool checkLongPress() {
int currentState = digitalRead(pin);
if (currentState == HIGH && prevState == HIGH) {
// Button is being held down
if (millis() - pressStartTime > LONG_PRESS_DURATION && !longPressTriggered) {
longPressTriggered = true;
return true;
}
}
return false;
}
// Getter for the button's name
const char* getName() {
return name;
}
};
class DateTimeSettings {
private:
// RTC reference
DS3231& rtc;
// LCD reference
LiquidCrystal_I2C& lcd;
// Setting state variables
bool isActive;
int settingIndex; // 0=day, 1=month, 2=hour, 3=minute
int currentDay, currentMonth, currentHour, currentMinute;
// Blinking effect variables
unsigned long lastBlinkTime;
const unsigned long BLINK_INTERVAL = 500; // 500ms blink interval
bool showField;
// Reference to century flag needed for RTC
bool& centuryFlag;
bool h12Flag, pmFlag; // RTC flags
public:
// Constructor
DateTimeSettings(DS3231& rtcInstance, LiquidCrystal_I2C& lcdInstance, bool& century)
: rtc(rtcInstance),
lcd(lcdInstance),
isActive(false),
settingIndex(0),
lastBlinkTime(0),
showField(true),
centuryFlag(century),
h12Flag(false),
pmFlag(false) {
}
// Start the settings mode
void start() {
isActive = true;
settingIndex = 0; // Start with day
// Get current values from RTC
currentDay = rtc.getDate();
currentMonth = rtc.getMonth(centuryFlag);
currentHour = rtc.getHour(h12Flag, pmFlag);
currentMinute = rtc.getMinute();
showField = true;
lastBlinkTime = millis();
displaySettings();
}
// Check if settings mode is active
bool isSettingActive() const {
return isActive;
}
// Exit settings mode
void exit() {
isActive = false;
lcd.clear();
}
// Move to the next field
void nextField() {
settingIndex++;
showField = true; // Reset blink state
if (settingIndex > 3) {
// All fields set, save the time
rtc.setDate(currentDay);
rtc.setMonth(currentMonth);
rtc.setHour(currentHour);
rtc.setMinute(currentMinute);
rtc.setSecond(0); // Reset seconds to 00
// Exit setting mode
exit();
return;
}
displaySettings();
}
// Increase the current field value
void increaseValue() {
switch (settingIndex) {
case 0: // Day
currentDay++;
if (currentDay > 31) currentDay = 1;
break;
case 1: // Month
currentMonth++;
if (currentMonth > 12) currentMonth = 1;
break;
case 2: // Hour
currentHour++;
if (currentHour > 23) currentHour = 0;
break;
case 3: // Minute
currentMinute++;
if (currentMinute > 59) currentMinute = 0;
break;
}
showField = true; // Reset blink state
displaySettings();
}
// Decrease the current field value
void decreaseValue() {
switch (settingIndex) {
case 0: // Day
currentDay--;
if (currentDay < 1) currentDay = 31;
break;
case 1: // Month
currentMonth--;
if (currentMonth < 1) currentMonth = 12;
break;
case 2: // Hour
currentHour--;
if (currentHour < 0) currentHour = 23;
break;
case 3: // Minute
currentMinute--;
if (currentMinute < 0) currentMinute = 59;
break;
}
showField = true; // Reset blink state
displaySettings();
}
// Update method to be called in the main loop
void update() {
// Return if not in setting mode
if (!isActive) return;
// Handle blinking effect
if (millis() - lastBlinkTime >= BLINK_INTERVAL) {
lastBlinkTime = millis();
showField = !showField;
displaySettings();
}
}
private:
// Display the settings screen
void displaySettings() {
lcd.clear();
lcd.setCursor(0, 0);
lcd.print("Set Date & Time");
lcd.setCursor(1, 1);
// Display day - blinking when being set
if (settingIndex != 0 || showField) {
print2digits(currentDay);
} else {
lcd.print(" ");
}
lcd.print("-");
// Display month - blinking when being set
if (settingIndex != 1 || showField) {
print2digits(currentMonth);
} else {
lcd.print(" ");
}
lcd.setCursor(8, 1);
// Display hour - blinking when being set
if (settingIndex != 2 || showField) {
print2digits(currentHour);
} else {
lcd.print(" ");
}
lcd.print(":");
// Display minute - blinking when being set
if (settingIndex != 3 || showField) {
print2digits(currentMinute);
} else {
lcd.print(" ");
}
}
// Helper function to print 2 digits with leading zero
void print2digits(int number) {
if (number < 10) {
lcd.print("0");
}
lcd.print(number, DEC);
}
};
//------------------------------------------------------------------------------
// Global Instances for Temperature and Humidity
//------------------------------------------------------------------------------
MeasurementSensor tempSensor(TREND_DISPLAY_DURATION_MS);
MeasurementSensor humiditySensor(TREND_DISPLAY_DURATION_MS);
void setup() {
Serial.begin(9600);
dht.begin();
delay(2000);
lcd.init();
lcd.backlight();
lcd.clear();
lcd.createChar(1, downChar);
lcd.createChar(2, upChar);
lcd.createChar(3, degreeChar);
lcd.createChar(4, minChar);
lcd.createChar(5, maxChar);
pinMode(pirPin, INPUT);
pinMode(BUTTON1PIN, INPUT);
pinMode(BUTTON2PIN, INPUT);
pinMode(BUTTON3PIN, INPUT);
// myRTC.setYear(2025);
// myRTC.setMonth(3);
// myRTC.setDate(20);
// myRTC.setHour(10);
// myRTC.setMinute(49);
// myRTC.setSecond(0);
}
void print2digits(int number) {
if (number < 10) {
lcd.print("0");
}
lcd.print(number, DEC);
}
int lastResetHour = -1; // Initialize to an invalid hour
// Create instances for each button
Button button1(BUTTON1PIN, "Button 1");
Button button2(BUTTON2PIN, "Button 2");
Button button3(BUTTON3PIN, "Button 3");
int displayModus = 1; // we want temp range when 2 we want humidity range
// Add this near the top of your code, with your other global instances
DateTimeSettings dateTimeSettings(myRTC, lcd, century);
void loop() {
delay(20);
// Check if we are in setting mode
if (dateTimeSettings.isSettingActive()) {
dateTimeSettings.update();
// Check for long press on button 1 to exit setting mode
if (button1.checkLongPress()) {
dateTimeSettings.exit();
return;
}
// Handle button 1 (short press - move to next field)
if (button1.update()) {
dateTimeSettings.nextField();
}
// Handle button 2 (decrease value)
if (button2.update()) {
dateTimeSettings.decreaseValue();
}
// Handle button 3 (increase value)
if (button3.update()) {
dateTimeSettings.increaseValue();
}
return; // Skip the normal loop when in setting mode
}
// Check for long press on button 1 to enter setting mode
if (button1.checkLongPress()) {
dateTimeSettings.start();
return;
}
// The rest of your existing loop code stays the same
// Update each button and print if pressed
if (button1.update()) {
Serial.print(button1.getName());
Serial.println(" pressed");
}
if (button2.update()) {
Serial.print(button2.getName());
Serial.println(" pressed");
count = 5;
previousMillis = 0;
displayModus = 1;
}
if (button3.update()) {
Serial.print(button3.getName());
Serial.println(" pressed");
count = 5;
previousMillis = 0;
displayModus = 2;
}
// Check for movement
pirValue = digitalRead(pirPin);
// Serial.println(pirValue);
if (pirValue) {
lcd.backlight();
}
// Do we need to update the display?
unsigned long currentMillis = millis();
if (currentMillis - previousMillis >= dhtInterval) {
previousMillis = currentMillis;
if (!pirValue) {
lcd.noBacklight();
}
count++;
// Read new values from the DHT sensor
float newTemperature = dht.readTemperature();
int newHumidity = dht.readHumidity();
if (isnan(newTemperature) || isnan(newHumidity)) {
Serial.println("Failed to read from DHT sensor!");
lcd.clear();
lcd.print(" *** DHT Error *** ");
delay(5000);
return; // next itteration in the loop
}
// Update our measurement sensors
tempSensor.update(newTemperature, currentMillis);
humiditySensor.update(newHumidity, currentMillis);
// Get current hour from RTC
int currentHour = myRTC.getHour(h12Flag, pmFlag);
// Check if hour has changed
if (currentHour != lastResetHour) { // || count%10==0
tempSensor.resetMinMax(newTemperature);
humiditySensor.resetMinMax(newHumidity);
lastResetHour = currentHour;
}
Serial.println(count);
char tempHistoryBuffer[MAX_HISTORY_STRING_LENGTH];
tempSensor.getHistoryString(false, tempHistoryBuffer, sizeof(tempHistoryBuffer));
Serial.print("min temp history: ");
Serial.println(tempHistoryBuffer);
char tempHistoryBuffer2[MAX_HISTORY_STRING_LENGTH];
tempSensor.getHistoryString(true, tempHistoryBuffer2, sizeof(tempHistoryBuffer2));
Serial.print("max temp history: ");
Serial.println(tempHistoryBuffer2);
Serial.println();
// Update the LCD display for temperature
lcd.setCursor(0, 0);
if (!(count % 6) && displayModus == 1) {
lcd.print("");
lcd.print(tempSensor.getLowest(), 1);
lcd.write(3);
lcd.print(" ");
lcd.print(tempSensor.getHighest(), 1);
lcd.write(3);
lcd.print(" ");
} else {
if (tempSensor.getArrow()) {
lcd.write(tempSensor.getArrow());
} else {
lcd.print(" ");
}
lcd.print(tempSensor.getMeasurement(), 1);
lcd.write(3); // degree symbol
lcd.print("C ");
}
// Update the LCD display for humidity
if (!(count % 6) && displayModus == 2) {
lcd.setCursor(9, 0);
lcd.print(humiditySensor.getLowest(), 1);
lcd.print("% ");
lcd.print(humiditySensor.getHighest(), 1);
lcd.print("%");
} else {
lcd.setCursor(12, 0);
if (humiditySensor.getArrow()) {
lcd.write(humiditySensor.getArrow());
} else {
lcd.print(" ");
}
lcd.print(humiditySensor.getMeasurement());
lcd.print("%");
}
// Update the LCD display second row, date
lcd.setCursor(1, 1);
print2digits(myRTC.getDate());
lcd.print("-");
print2digits(myRTC.getMonth(century));
// Update the LCD display second row, time
lcd.setCursor(10, 1);
print2digits(myRTC.getHour(h12Flag, pmFlag));
lcd.print(":");
print2digits(myRTC.getMinute());
}
}
```
[https://www.circuito.io/app?components=97,97,97,514,10167,11022,417986,821989,931983](https://www.circuito.io/app?components=97,97,97,514,10167,11022,417986,821989,931983)
# Arduino projects ideas
### Arduino projects ideas
1. #### LED Blinking Traffic Light
- **Description**: Build a simple traffic light simulation with red, yellow, and green LEDs that cycle in sequence.
- **Learning Objectives**: Digital output, basic timing with
delay(), and code structure (setup/loop).
- **Components**: 3 LEDs, resistors, breadboard, jumper wires.
- **Suggested Board**: Arduino UNO R4 Minima.
- **Code Concept**: Use
digitalWrite() to turn LEDs on/off with timed delays.
- **Challenge**: Build a second traffic light that interacts with teh first and emulates a real crossing.
2. #### Button-Controlled Buzzer
- **Description**: Press a button to make a buzzer play a tone; press again to stop it.
- **Optional**: add a led that shows when te buzzer is playing.
- **Learning Objectives**: Digital input, conditional statements (
if), basic sound generation.
- **Components**: Pushbutton, buzzer, resistor, breadboard.
- **Suggested Board**: Arduino Nano Every.
- **Code Concept**: Read button state with
digitalRead() and use
tone() for sound.
3. #### Temperature Monitor with LCD
- **Description**: Display room temperature on an LCD screen using a temperature sensor.
- **Learning Objectives**: Analog input, sensor interfacing, LCD output.
- **Components**: TMP36 or DHT11 sensor, 16x2 LCD, breadboard.
- **Suggested Board**: Arduino UNO R4 Minima.
- **Challenge**: add a led and/or buzzer that switches on when the temperature is outside of a preset range.
4. #### Auto lock PC/Laptop
-
**Description**: Build a system that detects if a user is present at a computer using a motion or distance sensor. If no one is detected for a set time (e.g., 5 minutes), it sends a signal to shut down the PC.
-
**Learning Objectives**: Sensor interfacing (analog/digital), timing logic, serial communication, basic PC interaction.
-
**omponents**: HC-SR04 ultrasonic sensor (distance) or PIR sensor (motion),
- **Suggested Board:** Arduino UNO R4 Minima (simple) or Arduino Nano 33 IoT (for added connectivity).
-
**Code Concept**:
- Use pulseIn() (for HC-SR04) or digitalRead() (for PIR) to detect presence.
- Implement a timer with millis() to track inactivity.
- Send a lock command via Serial (software) or toggle a relay (hardware simulation).
| Text Size (`setTextSize(n)`) | Character Width (px) | Height ? | Characters per Line (240 px / width) |
|---|
| 1 | 6 px (5 + 1 spacing) | 8 px | **40 chars** |
| 2 | 12 px | 16 px | **20 chars** |
| 3 | 18 px | 24 px | **13 chars** |
| 4 | 24 px | 32 px | **10 chars** |
| 5 | 30 px | 40 px | **8 chars** |
| 6 | 36 px | 48 px | **6 chars** |
The height is Text Size X 8 (?)
## Sleep and Wake up
##### Sleep types
- **Light sleep** → handig bij korte pauzes, reageert snel op beweging.
- **Deep sleep** → goed als er langere tijd geen beweging is (bespaart veel stroom).
- **Hibernation** → enkel nuttig als je op batterij werkt en uren/dagen wilt slapen;
je moet dan *alles* opnieuw initialiseren bij wake (display, DHT, Wi-Fi, etc.).
| Slaapmodus | CPU actief? | RTC actief? | RAM behouden? | Typisch verbruik |
|---|
| **Light sleep** | ❌ Nee | ✅ Ja | ✅ Ja | ~1–5 mA |
| **Deep sleep** | ❌ Nee | ✅ Ja | ❌ Nee (RAM weg) | ~0.1 mA |
| **Hibernation** | ❌ Nee | ❌ Nee | ❌ Nee | ~5–10 µA |
| Functie | Deep Sleep | Hibernation |
|---|
| Wake via timer | ✅ | ✅ |
| Wake via GPIO EXT0 | ✅ | ✅ |
| Wake via GPIO EXT1 | ✅ | ❌ |
| ULP / touch wake | ✅ | ❌ |
| RTC memory bewaren | ✅ | ❌ |
| Verbruik | ~100 µA | ~10 µA |
*(RTC memory: Klein stukje geheugen dat optioneel behouden blijft tijdens deep sleep.)*
##### Hoe het werkt
- De ESP32 blijft tijdens **deep sleep** bijna volledig uitgeschakeld.
- Alleen het **RTC-subsysteem (Real-Time Clock)** blijft actief.
- Dat subsysteem bewaakt een klein aantal speciale **RTC GPIO’s** (zoals GPIO 0, 2, 4, 12–15, 25–27, 32–39).
- Via **EXT0** kun je precies één van die pinnen gebruiken om wakker te worden.
##### EXT0/EXT1
- **EXT0:** slechts **één** pin, **level-triggered** (blijft hoog → blijft wakker).
- **EXT1:** kan **meerdere pins** combineren (OR/AND), **edge-like gedrag** (gaat van low naar high).
```c
# EXT0
esp_sleep_enable_ext0_wakeup(GPIO_NUM_13, 1); // Word wakker als pin 13 HIGH wordt
# EXT1
esp_sleep_enable_ext1_wakeup(1ULL << 12 | 1ULL << 13, ESP_EXT1_WAKEUP_ANY_HIGH);
```
#### Hibernation
```c
# je bereikt hibernation door in deep sleep alle power domains uit te zetten.
esp_sleep_enable_ext0_wakeup(GPIO_NUM_13, 1); // PIR HIGH wekt op
esp_sleep_pd_config(ESP_PD_DOMAIN_RTC_PERIPH, ESP_PD_OPTION_OFF); // RTC peripherals uit
esp_sleep_pd_config(ESP_PD_DOMAIN_RTC_SLOW_MEM, ESP_PD_OPTION_OFF);
esp_sleep_pd_config(ESP_PD_DOMAIN_RTC_FAST_MEM, ESP_PD_OPTION_OFF);
esp_deep_sleep_start(); // gaat in hibernation omdat alles uit is
```
#### Deep Sleep wake op PIR (ANY\_HIGH)
```c
#include
#define PIR_PIN 13 // RTC-capable pin
void setup() {
pinMode(PIR_PIN, INPUT); // of INPUT_PULLDOWN als je die wilt gebruiken
// Wake bij HIGH op deze pin (EXT1, multiple pins mogelijk)
esp_sleep_enable_ext1_wakeup(1ULL << PIR_PIN, ESP_EXT1_WAKEUP_ANY_HIGH);
// ... event. nog iets loggen
esp_deep_sleep_start();
}
void loop() {}
```
#### Light Sleep wake op PIR
```c
#include
#define PIR_PIN 13
void setup() {
Serial.begin(115200);
pinMode(PIR_PIN, INPUT);
esp_sleep_enable_ext1_wakeup(1ULL << PIR_PIN, ESP_EXT1_WAKEUP_ANY_HIGH);
}
void loop() {
// Doe je werk...
delay(50);
// Ga naar light sleep tot PIR HIGH wordt
esp_light_sleep_start();
// Wakker! (PIR hield de lijn even hoog; verwerk event)
Serial.println("Motion detected (woke from light sleep)");
// kleine debounce
delay(200);
}
```
# PIR Motion Detector Module
## PIR Motion Detector Module
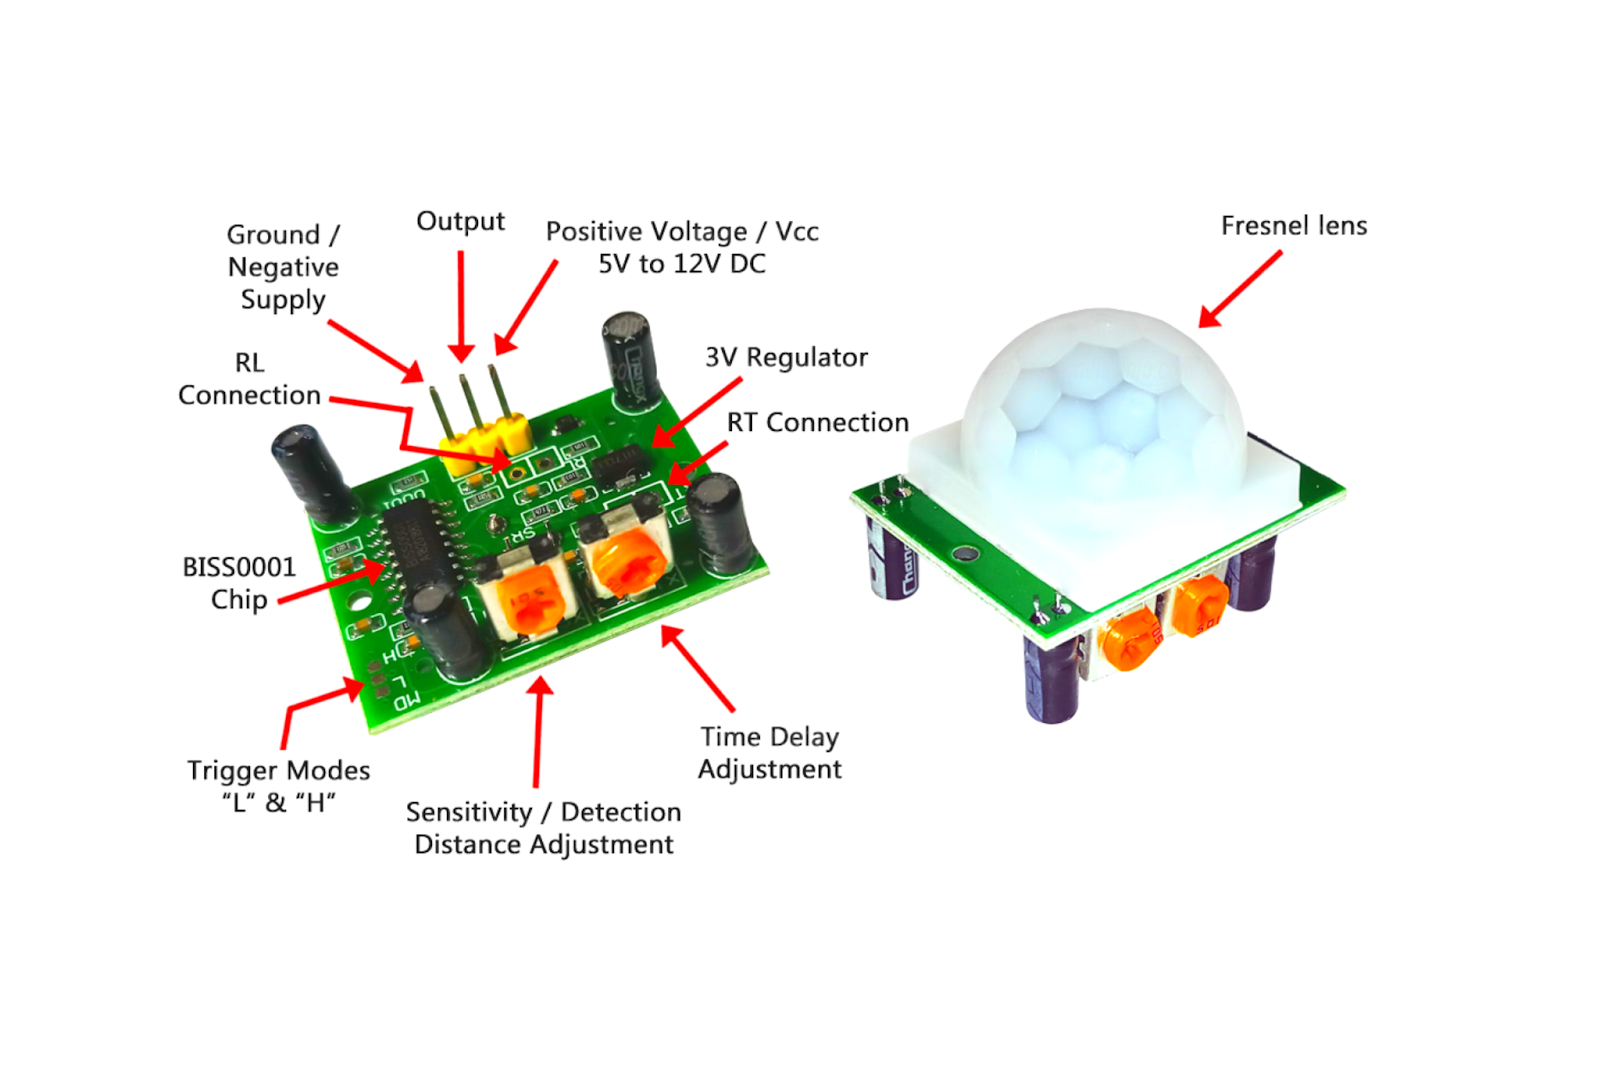
### Trigger Modes L & H
If you move the jumper to L position the sensor will 'toggle' (change state) every time motion is detected - probably providing the on-board timer has timed out. This is unlikely to be of much use in a practical application. (Watch the comments for corrections!)
Moving the jumper to the H position will result in the more usual sensor logic. The sensor will turn on when motion is detected and turn off some time after the last motion is detected. This sensor will reset the timer (which would otherwise turn the output off) every time motion is detected and would be suitable, for example, for room occupancy lighting control where you don't want the lights to blink off while the unit resets.
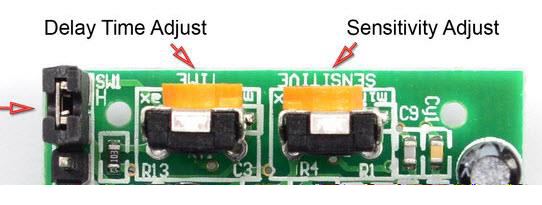
### Delay
Clockwise turn makes it more sensitive.
### Sensitivity
clockwise turn makes it more sensitive.
\--