Bijlagen, Notes en Voorbeelden
Voorbeelden stukjes code
- Unsorted Notes
- Useful Links
- Active Records - Queries naar DB
- GridView Widget
- Filter Grid view en Model Search
- Buttons Redirect
- Overzicht van URL naar view met 1:M relatie
- CRUD maken met Gii
- Forms
- Helpers
- Bootstrap 4
- Views
- Two database connections
- Nav - Menu's
- Joined Table Search
- Resources
- Login - Copied
- Login via DB
- Set Flash
- Opdracht - Voetbal Toernooi
- RESTfull API
- Active - inactive zetten van een object
- Dynamic return page
- Grouping rows in Gridview
Unsorted Notes
Voor- nadelen Laravel v. Yii
| Laravel | YII | |
| MVC | ✓ | ✓ |
| Model | Eloquent | Active Record |
| View/templating | Blade | PHP met 'Yii Snippets' |
| Routing | Expliciet | Impliciet / Expliciet |
| Migrations | ✓ |
✓ (meer als optie) |
| Model creations | command line |
GUI, reverse engineered form DB |
| Controller Creation | command line |
GUI, create full CRUD |
| View creation | ? |
GUI, create full CRUD |
| Documentation | *** |
** |
| Active development | ✓ | ✓ |
| Add Ons / Libraries | *** | ** |
| Install Base (volgens Google) | 484,970 | 58,800 |
Grootste voordeel is de GUI waarmee je reverse engineered een CRUD maakt.
Install Datepicker
(in project root)
change in file composer.dev "minimum-stability": "dev",
composer clear-cache
composer require kartik-v/yii2-widget-datepicker
https://github.com/kartik-v/yii2-widget-datepicker
Create (temporary swap on Ubuntu)
free -m

total used free shared buffers cached
Mem: 2048 357 1690 0 0 237
-/+ buffers/cache: 119 1928
Swap: 0 0 0
/bin/dd if=/dev/zero of=/var/swap.1 bs=1M count=1024
/sbin/mkswap /var/swap.1
/sbin/swapon /var/swap.1https://getcomposer.org/doc/articles/troubleshooting.md#proc-open-fork-failed-errors
Install Bootstrap 4
composer require --prefer-dist yiisoft/yii2-bootstrap4Redirect
return $this->redirect(['view', 'id' => $model->id]);Post form on dropdown change
<select name="status" id="status" onchange="this.form.submit()">Useful Links
Useful Links
Useful extensions
https://wbraganca.com/yii2extensions
Sorting/filtering in model met relaties
https://www.yiiframework.com/wiki/653/displaying-sorting-and-filtering-model-relations-on-a-gridview
Bootstrap (4) Icons
https://www.w3schools.com/icons/bootstrap_icons_glyphicons.asp
Caching example
Easy Debug - d() en dd()
https://www.yiiframework.com/wiki/793/debuging-variables-in-yii2
Krajee Exention
Login from Database
http://code-epicenter.com/how-to-login-user-from-a-database-in-yii-framework-2/
QR Code
https://qrcode-library.readthedocs.io/en/latest/
References
https://www.tutorialspoint.com/yii/index.htm
Active Records - Queries naar DB
Active Records
select
$examen = examen::find()->where(['actief' => '1'])->orderBy(['datum_van' => 'SORT_DESC'])->one();

$examen = examen::find()->where(['actief' => '1'])->orderBy(['datum_van' => 'SORT_DESC'])->all();

$gesprekSoort = gesprekSoort::find()->all();

$gesprekSoort = examenGesprekSoort::findAll(['examen_id' => $id]);

$gesprekken = gesprekSoort::find()->where([])->joinWith('examenGesprekSoorts')->all();

// only two columns and return array (instead of object).
$criterium = Criterium::find()->select('id, omschrijving')
     ->where([ 'werkprocesid' => $model->form->werkproces ])->asArray()->all();

// zoek alle distinct studenten op naam en gebruik like %
$resultaat = resultaat::find()->select(['student_nummer','student_naam'])->distinct()
     ->where(['like', 'student_naam', $model->student_naam])->orderBy(['student_naam' => 'SORT_ASC'])->all();

// andWhere (na de where plaatsen)
->andWhere(['<','Bedrag', 100000])->
Insert update delete
// INSERT (table name, column values)
Yii::$app->db->createCommand()->insert('user', [
    'name' => 'Sam',
    'age' => 30,
])->execute();

// INSERT via raw Query
$sql="insert into examen_gesprek_soort (examen_id, gesprek_soort_id) values(:examenid, :gesprekid)";
$params = array(':examenid'=> $id, ':gesprekid' => $value );
$query->createCommand()->sql;
$result = Yii::$app->db->createCommand($sql)->bindValues($params)->execute();

// debug query
$query = new Books::find()->where('author=2');
 echo $query->createCommand()->sql;

// UPDATE (table name, column values, condition)
Yii::$app->db->createCommand()->update('user', ['status' => 1], 'age > 30')->execute();

// DELETE (table name, condition)
Yii::$app->db->createCommand()->delete('user', 'status = 0')->execute();

$sql="delete from examen_gesprek_soort where examen_id = :examenid";
$params = array(':examenid'=> $id);
$result = Yii::$app->db->createCommand($sql)->bindValues($params)->execute();

$sql="select * from student";
$result = Yii::$app->db->createCommand($sql)->queryAll(); //execute() returned only a count
GridView Widget
GridView Widget
Make item clickable link
[
    'attribute'=>'naam',
    'label' => 'Studentnaam',
    'contentOptions' => ['style' => 'width:600px; white-space: normal;'],
    'format' => 'raw',
    'value' => function ($data) {
        return Html::a($data->naam, ['/examen/update?id='.$data->id],['title'=> 'Edit',]);
     },
],

// for related table values, use
'value' => 'student.locatie',
Title of column name
Change the model, example:
public function attributeLabels() {
	return [
		'id' => 'ID',
		'naam' => 'examennaam',
		'datum_van' => 'van',
		'datum_tot' => 'tot',
		'actief' => 'actief',
	];
}
The database column 'datum_van' will be showed as 'van'.
View column conditionally
[
    'class' => 'yii\grid\ActionColumn',
    'contentOptions' => ['style' => 'width:400px; white-space: normal;'],
    'header'=>'Actions',
    'template' => '{view} {update} {delete}',
    'visibleButtons'=>[
        'view'=> function($model){
              return $model->status!=1;
         },
    ]
],
Add own controller (copy)
[
    'class' => 'yii\grid\ActionColumn',
    'template' => '{download} {view} {update} {delete}',
    'buttons' => [
        'download' => function ($url) {
            return Html::a(
                '<span class="glyphicon glyphicon-arrow-down"></span>',
              	['another-controller/anotner-action', 'id' => $model->id],   // mag ook alleen url als je geen parameter wilt meegeven, dan hoef je geen array te maken.
                [
                    'title' => 'Download',
                    'data-pjax' => '0',
                ]
            );
        },
    ],
],

// Alternatief, copy button, niet vergeten in template te te zetten
    'buttons'=>[
         'copy' => function ($url, $model, $key) {
             return Html::a('<span class="glyphicon glyphicon-copy"></span>', ['copy', 'id'=>$model->id],['title'=>'Copy']);
         },
    ],
Boolean (toggle icon)
Show boolean, if clicked, change status.
 [
   'attribute'=>'actief',
   'contentOptions' => ['style' => 'width:10px;'],
   'format' => 'raw',
       'value' => function ($data) {
         	// $status = icon 'ok' or icon 'minus' depending on $data->ctief
            $status = $data->actief ? '<span class="glyphicon glyphicon-ok"></span>' : '<span class="glyphicon glyphicon-minus"></span>';
            return Html::a($status, '/rolspeler/toggle-actief?id='.$data->id);
        }
 ],

// Controller
 public function actionToggleActief($id) {
        // function toggles boolean actief, in this example only one row can be active, so we execute two queries
        $sql="update examen set actief=1 where id = :id; update examen set actief=0 where id != :id;";
        $params = array(':id'=> $id);
        Yii::$app->db->createCommand($sql)->bindValues($params)->execute();
        return $this->redirect(['index']); // go back to view
    }
In this example only one row can be active. If you want a simple toggle use SQL statement:
update <table> set abss(active = active-1)Drop down in grid select
[
    'attribute'=>'attribute name',
    'filter'=>array("ID1"=>"Name1","ID2"=>"Name2"),
],

// of

[
    'attribute'=>'attribute name',
    'filter'=>ArrayHelper::map(Model::find()->asArray()->all(), 'ID', 'Name'),
],

// of

[
    'attribute' => 'attribute_name',
    'value' => 'attribute_value',
    'filter' => Html::activeDropDownList(
      				$searchModel,
      				'attribute_name',
                    ArrayHelper::map(ModelName::find()->asArray()->all(), 'ID', 'Name'),
                    ['class'=>'form-control','prompt' => 'Select Category']
                ),
],
In dit voorbeeld wordt er data uit een andere table/model gehaald. De foreign key moet worden ge-update aan de hand van de rolspelers table.
<?php

// ************************
// * in controller        *
// ************************

// pass rolspeler

$rolspeler = Rolspeler::find()->where(['actief' => '1'])->all();
return $this->render('index', [
     'searchModel' => $searchModel,
     'dataProvider' => $dataProvider,
     'rolspeler' => $rolspeler,
]);

// fucntion for update (ajax) call from form

public function actionUpdateStatus($id, $status, $rolspelerid) {
    $model = $this->findModel($id);
    $model->status=$status;
    $model->rolspelerid=$rolspelerid;
    $model->save();
}

// ************************
// * in view (index)      *
// ************************

// ajax call to update record

<script>
    function changeStatus(id, status, rolspelerid) {
        // console.log(val, id);
        $.ajax({
        url: "<?= Url::to(['update-status']) ?>",
            data: {id: id, 'status': status, 'rolspelerid': rolspelerid },
            cache: false
        }).done(function (html) {
            location.reload();
        });
    }
</script>


// prepare ass. array for the drop down.

<?php $rolspelerList = ArrayHelper::map($rolspeler,'id','naam'); ?>

...

<?= GridView::widget([
     'dataProvider' => $dataProvider,
     'filterModel' => $searchModel,
     'columns' => [

      // show dropdown and call ajax script that calls the methos/function in teh controller

     'format' => 'raw',
         'value' => function ($model) {
             return Html::dropDownList('status', $model->status, ['0'=>'Wachten','1'=>'Loopt','2'=>'Klaar'],
             ['onchange' => "changeStatus('$model->id', $(this).val(), '$model->rolspelerid')"]);
            }],

...
From: https://www.trickyhints.com/how-to-create-dropdown-in-yii2-gridview/
Column customization
In Yii2's GridView, each column in the grid can be customized using a variety of properties. These properties allow you to define how each column behaves, how it's rendered, and how it interacts with the data provided. Here's a list of common properties that you can specify in a column in Yii2 GridView:
**attribute**: The attribute name of the data model. The value of the attribute will be displayed in this column.
**label**: The label of the column in the header.
**value**: A PHP callable that returns the content of the column. It should be used if the column content is not directly tied to a model attribute.
**format**: How the data of this column will be formatted. Common formats include 'text', 'html', 'date', 'number', etc.
**header**: The header cell content. This will override the automatically generated header cell content.
**footer**: The footer cell content. This will override the automatically generated footer cell content.
**headerOptions**: HTML attributes for the header cell tag.
**contentOptions**: HTML attributes for the data cell tag.
**footerOptions**: HTML attributes for the footer cell tag.
**visible**: Whether the column is visible. If set to false, the column will not be displayed.
**filter**: The filter input content. This can be a string or an array to specify the type of filter input.
**filterOptions**: HTML attributes for the filter cell tag.
**headerHtmlOptions**: Deprecated, use `headerOptions` instead.
**footerHtmlOptions**: Deprecated, use `footerOptions` instead.
**class**: The class name of the column. Yii2 provides several built-in column types like `yii\grid\SerialColumn`, `yii\grid\DataColumn`, `yii\grid\CheckboxColumn`, etc.
**enableSorting**: Whether sorting is enabled for this column.
**sortLinkOptions**: HTML attributes for the sorting link.
**filterInputOptions**: HTML attributes for the filter input.
**filterWidgetOptions**: Configuration options for the filter widget.
**noWrap**: Whether to disable text wrapping for this column.
Filter Grid view en Model Search
In Search Model for filter
add public property
public $locatie;add to safe in rules
 public function rules() {
    return [
        ....
        [['locatie'], 'safe'],
    ];
}
add in join
// locatie is attribute from student
$query = Gesprek::find()
            ->joinwith(['student'])
note that student is relation
public function getStudent()
{
   return $this->hasOne(Student::className(), ['id' => 'studentid']);
}
add in andFilterWhere
$query->andFilterWhere(['like', 'student.locatie', $this->locatie]);In Search Model for sort
add sort attributes
$dataProvider->sort->attributes['locatie'] = [
     'asc' => ['student.locatie' => SORT_ASC],
     'desc' => ['student.locatie' => SORT_DESC],
];
In view
add column
[
  'attribute' => 'locatie',
  'contentOptions' => ['style' => 'width:20px;'],
  'format' => 'raw',
  'value' => 'student.locatie',
],
Buttons Redirect
Example Buttons
//Cancel
<?= Html::a('Cancel', ['index'], ['class'=>'btn btn-primary', 'title'=> 'Mouse over Text',]) ?>

//Delete
<?= Html::a('Delete', ['delete', 'id' => $model->id], [
            'class' => 'btn btn-danger',
            'data' => [
                'confirm' => 'Are you sure you want to delete this item?',
                'method' => 'post',
                'title' => 'Mouse Over Text',
            ],
        ]) ?>
Back Button
<?= Html::a( 'Cancel', Yii::$app->request->referrer , ['class'=>'btn btn-primary']); ?>Redirect
return $this->goBack((!empty(Yii::$app->request->referrer) ? Yii::$app->request->referrer : null));return $this->redirect(Yii::$app->request->referrer);
return $this->redirect(Yii::$app->request->referrer ?: Yii::$app->homeUrl);
return $this->goBack((!empty(Yii::$app->request->referrer) ? Yii::$app->request->referrer : null));Overzicht van URL naar view met 1:M relatie
Hieronder een schematisch overzicht van de belangrijkste onderdelen hoe je van een URL via de controller en model de juisten informatie in de view plaatst.
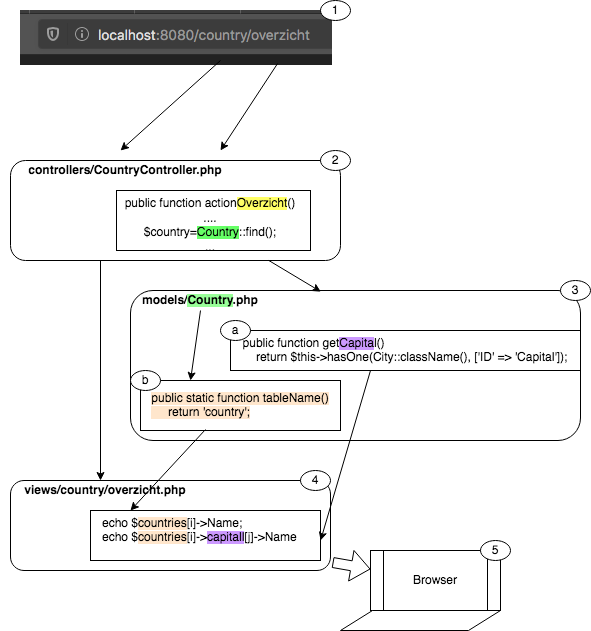
- Dit is de URL die de gebruiker invoert. Via de routing worden twee items uit de URL gehaald: (a) country en (b) overzicht. Item (a) is de controller-naam en item (b) is functie-naam (methodenaam). De controller zelf is te vinden in de file controllers/Country.php deze file-naam komt ook overeen met de item (a).
- In de methode actionOverzicht, waarvan de naam dus uit item (b) van de URL komt, wordt een $country object gemaakt. Dit object is verbonden met de methode Country en deze is weer beschreven in de models/Country.php en wijst vanuit daar naar de juiste database tabel.
- Vanuit de controller wordt er verwezen naar het model. In het model is beschreven waar de data werkelijk kan worden gevonden. In de methode tableNaam() wordt beschreven in welke tabel de informatie staat. In de methodes getCapital en getCountrylanguages wordt beschreven hoe een andere tabel is gekoppeld aan deze country tabel.
- In de view kunnen we het object $country dat is gemaakt in de controller gebruiken om gegevens uit de tabel af te drukken. Via de methodes getCapital en getCountrylanguages kunnen gegevens uit de andere tabellen die zijn gekoppeld aan $country ook worden afgedrukt. Afhankelijk van de soort relatie 1:1 of 1:N krijg je een waarde of een array met waardes terug.
- De view maakt (rendert) de hele pagina en stuurt deze in zijn geheel naar de browser.
Opmerking: Een methode (NL) of method (EN) is een functie in een class. Zodra je leest public function Abc() { dan is Abs eigenlijk een methode.
Toelichting Stap 3a
public function getRelatie() {
    return $this->hasMany(Relatie::className(), ['key.relatie' => 'key.thismodel']);
}
CRUD maken met Gii
Create CRUD Example
Invullen (in dit voorbeeld is het model examen al gemaakt, examen is een tabel in de database).
| Model Class | app\models\Examen |
| Search Model Class | app\models\ExamenSearch |
| Controller Class | app\controllers\ExamenController |
| View path | leeg laten (wordt default waaarde) |
Forms
Active Form en Form mix
Eigen fields toevoegen in Active form, voorbeeld:
<select name="gesprek[status]" id="status">gesprek in dit voorbeeld de model naam, en status is de naam van het form-veld.
Dit veld wordt in de standaard update automatisch gesaved.
Drop down (look-up in forms)
In controller get data for dop down, stel het model/table heet xxx.
use app\models\xxx;

...

$xxxModel = xxx::find()->all();

...

return $this->render('create', [
  'model' => $model,
  'xxxModel' => $xxxModel,
]);
Dan in form
use yii\helpers\ArrayHelper;

...

<?php
    $itemList=ArrayHelper::map($xxxModel,'id','omschrijving');

   	// Het id uit de drop down wordt in het huidige model ingevoerd, hier heet deze foreignKey
    echo $form->field($model, 'foreignKey')->dropDownList($itemList,['prompt'=>'Please select']);
?>
Change label
<?= $form->field($model, 'databasecolumn')->textInput()->label('Your nice label') ?> Helpers
HTML::a
// both the same
return Html::a($data->naam, ['/examen/update?id='.$data->id],['title'=> 'Edit',]);
return Html::a($data->naam, ['/examen/update', 'id'=>$data->id], ['title'=> 'Edit',]);

// back
 <?= Html::a( 'Cancel', Yii::$app->request->referrer , ['class'=>'btn btn-primary']); ?>
Array helper
use yii\helpers\ArrayHelper;

$dropdownlist = Arrayhelper::map($student,'id','naam');

//input [ [ 'id' => '999', 'naam' => 'Mark de Groot'], [ 'id' => ..... ], [ ....], ....]
//result [ '999' => 'Mark de Groot', ...];
Link met confirm (gidview Widget)
echo Html::a("<span style=\"color:#800000\" class=\"glyphicon glyphicon-print\"></span>",
   ['print/index', 'id'=>-99],
     [  'title' => 'Print ALL',
        'data' => [
        'confirm' => 'Are you sure you want to print this item?',
        'method' => 'post',
     ],
   ] );
Link met confirm en tooltip (Html::a)
Html::a("<span class=\"glyphicon glyphicon-trash\"></span>",
	['/uitslag/remove', 'studentid'=>$dataSet[$naam]['studentid'], 'examenid'=>$examenid ],
	['data-confirm' => 'Delete all results from '.$naam.' from this exam?', 'title'=> 'Verwijder uitslag']);
Html::a( [naam], [link, parameter, parameter], [options] )
Options in het bovenstaande voorbeeld: data-confirm en title. Andere option is class
Yii::$app
 Yii::$app->requestedRoute;          // route, example query/help
 Yii::$app->controller->action->id   // action, example help
Bootstrap 4
Install
composer require --prefer-dist yiisoft/yii2-bootstrap4In composer.json
...
    "minimum-stability": "dev",
    "require": {
        ...
        "yiisoft/yii2-bootstrap4": "^1.0@dev"
...
in site.css (optional)
// Added by MB

.nav {
    font-size: 2.4em;
}

.nav li {
    padding-right:0px;
    font-size: 1.4em;
}


ul.nav a:hover {
    color:#a94442;
    background-color: #E0E0E0;
}

h1 {
    color:#424ca9;
    font-style: italic;
}
Views
Include HTML
<?= \Yii::$app->view->renderFile('@app/views/site/fileToInclude.php'); ?>Set Flash
Terugkoppeling vanuit de controller naar de view.
In Controller
Yii::$app->session->setFlash('success', "Exam deleted.");

of

Yii::$app->session->setFlash('error', "Exam cannot be deleten, it has still forms attached to it.");
In View
  <?php if (Yii::$app->session->hasFlash('success')): ?>
    <div class="alert alert-success alert-dismissable">
         <button aria-hidden="true" data-dismiss="alert" class="close" type="button">×</button>
         <?= Yii::$app->session->getFlash('success') ?>
    </div>
  <?php endif; ?>

  <?php if (Yii::$app->session->hasFlash('error')): ?>
    <div class="alert alert-danger alert-dismissable">
      <button aria-hidden="true" data-dismiss="alert" class="close" type="button">×</button>
      <?= Yii::$app->session->getFlash('error') ?>
    </div>
  <?php endif; ?>
Redirect
return $this->redirect(['index']);
Two database connections
Zie; http://www.bsourcecode.com/yiiframework2/yii2-0-database-connection/
Nav - Menu's
Example menu.
<?php

echo Nav::widget([
    'encodeLabels' => false,
    'items' => [
        [   'label' => 'Menu1',
            'visible' => (isset(Yii::$app->user->identity->role) && Yii::$app->user->identity->role == 'admin'),
            'items' => [
                 ['label' => 'Item1', 'url' => ['/control/action'] ],
                 ['label' => 'Item2', 'url' => ['/control/action'] ],
                 ['label' => 'Item3', 'url' => ['/control/action'] ],
                 [  'label' => 'Item4',
                     'url' => ['/control/action'],
                      'linkOptions' => array('onclick'=>'return confirm("Are you sure? ")'),
             ],
                 ['label' => '-----------------------------------'],
                 ['label' => 'Item1', 'url' => ['/control/action'] ],
            ],
            'options' => ['class' => 'nav-item']
        ],

   		[   'label' => 'Menu2',
            'visible' => (isset(Yii::$app->user->identity->role) && Yii::$app->user->identity->role == 'admin'),
            'items' => [
                 ['label' => 'Item1', 'url' => ['/control/action'] ],
                 ['label' => 'Item2', 'url' => ['/control/action'] ],
                 [  'label' => 'Item3',
                    'url' => 'https://server.com/page1',
                    'template'=> '<a href="{url}" target="_blank">{label}</a>',
                    'linkOptions' => ['target' => '_blank'],
                  ],
            ],
            'options' => ['class' => 'nav-item']
        ],
    ],
]);
Split menu from main.php
// In main.php

// remove the use *navbar* lines (2)

<header>
	// remove menu here and replace it with this line
    <?php echo Yii::$app->view->renderFile('@app/views/layouts/menu.php'); ?>
</header>

// now you can put your menu in the file menu.php (same directory)
// menu.php
<?php
use yii\bootstrap4\Nav;
use yii\bootstrap4\NavBar;
use yii\bootstrap4\Html;
NavBar::begin([
'brandLabel' => Yii::$app->name,
'brandUrl' => Yii::$app->homeUrl,
'options' => [
'class' => 'navbar navbar-expand-md navbar-dark bg-dark fixed-top',
],
]);
echo Nav::widget([
'options' => ['class' => 'navbar-nav'],
'items' => [
...
...Joined Table Search
Case Gesprek has an N:1 relation with Student. Gesprek has a FK studentid The table student has a naam
Gesprek Model
Create relation
In het Model Gesprek van het object
public function getStudent()
{
    return $this->hasOne(Student::className(), ['id' => 'studentid']);
}
Gesprek View
In de GridView Widget
[
   'attribute' => 'student',
   'value' => 'student.naam',
 ],
GesprekSearch model
- line 3 add the public variable
- line 9 add student searchbox
- line 19 add join
- line 22-24 add sorting
- line 27 add filter in query
class GesprekSearch extends Gesprek
{
    public $student;  // ADD student!

    public function rules()
    {
        return [
            [['formid', 'rolspelerid', 'status'], 'integer'],
            [['opmerking', 'student'], 'safe'], // ADD student!
        ];
    }

    ...

    public function search($params)
    {

    $query = Gesprek::find()
            ->joinwith(['examen', 'form', 'student']) // ADD student!
     ...

     $dataProvider->sort->attributes['student'] = [ // ADD this block to suppoer sorting
            'asc' => ['student.naam' => SORT_ASC],
            'desc' => ['student.naam' => SORT_DESC],
     ];
     ...
     $query->andFilterWhere(['like', 'student.naam', $this->student]); // ADD filter!
See: https://www.yiiframework.com/wiki/653/displaying-sorting-and-filtering-model-relations-on-a-gridview
Resources
Official docs
Yii2 Quick Start Guide
http://quickstart.yii2tutorial.com/content/ch11#11-1
Yii2 Lessons
Yii2 Tutorials
Beginning Yii2
Building a Youtube Clone
Russian Forum (translated in English)
Examples (web sites build in Yii)
- https://yiipowered.com/en
- https://monoray.ru/products/6-open-real-estate
- https://sakuracommerce.com/
Login - Copied
Customize Authentication On Yii Framework Using MySQL Database
Just managed to find some time to play around with Yii. Yii is powerful but there is still a long way to go if we are talking about documentation for Yii framework. In Yii framework, we can see that it is very different from CodeIgniter where documentation is really structured and well understood. Nonetheless, i still feel that Yii framework is worth to explore. I managed to get my own customized authentication on Yii by adding some secure feature such as hashing, salt, key and etc. So here i am writing this tutorial to share with you more about Yii framework using MySQL database.
Requirement
Since this is more like a follow up tutorial, there are a few requirements before you start reading this tutorial.
Customize Authentication - Database
Now here comes the tricky part. We need a database that stored our hashed password which is 128 bits since i am using sha512. Our data schema should looks like this,
CREATE TABLE tbl_user (
    id INTEGER NOT NULL PRIMARY KEY AUTOINCREMENT,
    username VARCHAR(128) NOT NULL,
    password VARCHAR(128) NOT NULL,
    email VARCHAR(128) NOT NULL
);
Well, it looks the same as the demo one so just ignore me lol. Create this table and we are ready to do some MVC. If you are following the tutorial you would most likely get a CRUD user setup. But we only have 'admin' and 'demo' login account. We would definitely want something better.
Customize Authentication - Model
In order to validate a user, we need to create a few methods in the model folder in order to authenticate and store user password. We will need to create these functions on our User.php file on our model folder.
/**
 * @return boolean validate user
 */
public function validatePassword($password, $username){
    return $this->hashPassword($password, $username) === $this->password;
}
/**
 * @return hashed value
 */
DEFINE('SALT_LENGTH', 10);
public function hashPassword($phrase, $salt = null){
    $key = 'Gf;B&yXL|beJUf-K*PPiU{wf|@9K9j5?d+YW}?VAZOS%e2c -:11ii<}ZM?PO!96';
    if($salt == '')
        $salt = substr(hash('sha512', $key), 0, SALT_LENGTH);
    else
        $salt = substr($salt, 0, SALT_LENGTH);
    return hash('sha512', $salt . $key . $phrase);
}
the two methods above is used to validate the user password during login and the other method returns a hashed password given the original plain password value. Once these two methods are pasted into the user.php file. We are done with our modal!
Customize Authentication - Controller
In controller, we need to modify the create and update handler but i will just demonstrate the create user handler. Go to your controller folder and look for UserController.php. Change the method actionCreate to the following
/**
 * Creates a new model.
 * If creation is successful, the browser will be redirected to the 'view' page.
 */
public function actionCreate()
{
    $model=new User;

    // Uncomment the following line if AJAX validation is needed
    // $this->performAjaxValidation($model);

    if(isset($_POST['User']))
    {
        $model->attributes=$_POST['User'];
        $model->password = $model->hashPassword($_POST['User']['password'], $_POST['User']['email']);
        if($model->save())
            $this->redirect(array('view','id'=>$model->ID));
        else
            $model->password = $_POST['User']['password'];
    }

    $this->render('create',array(
        'model'=>$model,
    ));
}
This way, we can create user with hashed password instead of plain password stored in our database.
Customize Authentication - Component
Next we need to authenticate our users. The original one just defined 'demo' and 'admin' as the only users that we are able to login. But now we have a database and a list of user and password. We should really secure our login. Here we modify our original authentication method to the following one.
public function authenticate()
{
    $username = $this->username;
    $user = User::model()->find('username=?', array($username));
    if($user === NULL)
        $this->errorCode=self::ERROR_USERNAME_INVALID;
    else if(!$user->validatePassword($this->password, $this->username))
        $this->errorCode=self::ERROR_PASSWORD_INVALID;
    else{
        $this->username = $user->username;
        $this->errorCode=self::ERROR_NONE;

    }
    return !$this->errorCode;
}
this allowed us to go through the users in our database table instead of the hardcoded one by using the method we wrote previously on the modal folder.
Now, our user will be authenticate using our customized authentication process rather than using the default one!
Login via DB
Maak een database tabel
CREATE TABLE `tbl_user` (
  `id` int(11) NOT NULL,
  `username` varchar(128) NOT NULL,
  `password` varchar(128) NOT NULL,
  `authKey` varchar(200) DEFAULT NULL,
  `role` varchar(20) DEFAULT NULL
) ENGINE=InnoDB DEFAULT CHARSET=utf8mb4;

ALTER TABLE `tbl_user`
  ADD PRIMARY KEY (`id`),
  ADD UNIQUE KEY `username` (`username`);

ALTER TABLE `tbl_user`
  MODIFY `id` int(11) NOT NULL AUTO_INCREMENT, AUTO_INCREMENT=5;
COMMIT;
Create CRUD voor tbl_user

app\models\TblUser
app\models\TblUserSearch
app\controllers\TblUserController
Pas actionCreate voor TblUserController aan
public function actionCreate()
{
    $model = new tblUser();

    if ($model->load(Yii::$app->request->post()) ) {
        $model->password=sha1($model->password);
        $model->authKey=md5(openssl_random_pseudo_bytes(40));
        if ($model->save() ) {
            return $this->redirect(['view', 'id' => $model->id]);
        }
    }

    return $this->render('create', [
        'model' => $model,
    ]);
}
Dit zorgt ervoor dat er
- een hash wordt gegenereerd als er een nieuwe user wordt aangemaakt
- het password wordt gehashed
Pas model User.php aan
<?php

namespace app\models;

class User extends \yii\db\ActiveRecord implements \yii\web\IdentityInterface
{
    public static function tableName()
    {
        return 'tbl_user';
    }

    public function rules()
    {
        return [
            [['username', 'password', 'email'], 'required'],
            [['username', 'password', 'email'], 'string', 'max' => 128],
            [['role'], 'string', 'max' => 20],
        ];
    }

    public function attributeLabels()
    {
        return [
            'id' => 'ID',
            'username' => 'Username',
            'password' => 'Password',
            'role' => 'Role',
            'email' => 'Email',
        ];
    }

    public static function findIdentity($id)
    {
        return static::findOne($id);
    }

    public static function findIdentityByAccessToken($token, $type = null)
    {
        return static::findOne(['access_token' => $token]);
    }

    public static function findByUsername($username)
    {
        return static::findOne(['username' => $username]);
    }


    public function getId()
    {
        return $this->id;
    }

    public function getAuthKey()
    {
        return $this->authKey;
    }


    public function validateAuthKey($authKey)
    {
        return $this->authKey === $authKey;
    }


    public function validatePassword($password)
    {
        return $this->password === sha1($password);
    }
}
Users aanmaken met CRUD tbl_user
Let op:
Get role
Yii::$app->user->identity->roleToDo
User can change his password
-> new form and access based on Yii:$app->user->identity->username
Set Flash
Set Flash
Terugkoppeling vanuit de controller naar de view.
In Controller
Yii::$app->session->setFlash('success', "Exam deleted.");

of

Yii::$app->session->setFlash('error', "Exam cannot be deleten, it has still forms attached to it.");
In View
  <?php if (Yii::$app->session->hasFlash('success')): ?>
    <div class="alert alert-success alert-dismissable">
         <button aria-hidden="true" data-dismiss="alert" class="close" type="button">×</button>
         <?= Yii::$app->session->getFlash('success') ?>
    </div>
  <?php endif; ?>

  <?php if (Yii::$app->session->hasFlash('error')): ?>
    <div class="alert alert-danger alert-dismissable">
      <button aria-hidden="true" data-dismiss="alert" class="close" type="button">×</button>
      <?= Yii::$app->session->getFlash('error') ?>
    </div>
  <?php endif; ?>
xxx
Opdracht - Voetbal Toernooi
1. Bij de onderstaande opdracht ga je een kleine applicatie die een voetbaltournooi probeert na te bootsen. Je kunt wedstrijden bekijken, opslaan, wijzigen en verwijderen. Elke wedstrijd bestaat uit twee teams en elk team bestaat uit meerdere spelers.
2. Jouw opdracht is om de onderstaande ERD om te zetten in een CRUD applicatie. Let daarbij op de relaties tussen Team en Game
3. Maak een nieuw Yii Project aan in
composer create-project --prefer-dist yiisoft/yii2-app-basic Tournament4. Je mag de database zelf maken (goed om zelf te oefenenen).
ERD
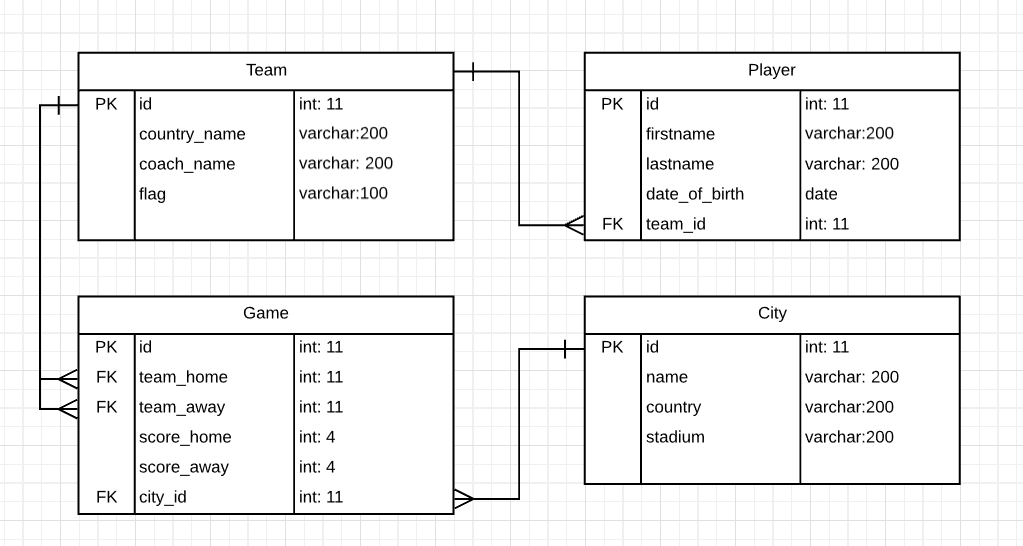
Repository: https://github.com/ROC-van-Amsterdam-College-Amstelland/tournament-examen-oefening
RESTfull API
Om van een model een restfull API te maken, voeg de volgende controller toe:
<?php

namespace app\controllers;

use yii\rest\ActiveController;

class ApiController extends ActiveController {
    public $modelClass = 'app\models\<Model_Naam>';
}


?>
In de browser krijg je XML terug, test via Postman en je ziet dat je JSON terug krijgt.
Of plaats zelf een controller in
class HiscoresController extends Controller
{
    /**
     * {@inheritdoc}
     */
    public function behaviors()
    {
        return [
            'verbs' => [
                'class' => VerbFilter::className(),
                'actions' => [

                ],
                'class' => '\yii\filters\Cors',
                    'cors' => [
                    'Origin' => ['*'],
                    'Access-Control-Request-Method' => ['GET', 'POST'],
                    'Access-Control-Request-Headers' => ['*'],
                ],
            ],
        ];
    }

    public static function allowedDomains()
    {
        return [
            // '*',                        // star allows all domains
            'http://localhost:3000',
            'http://test2.example.com',
        ];
    }

    public function beforeAction($action)
    {
        $this->enableCsrfValidation = false;
        return parent::beforeAction($action);
    }

  	public function actionApiPost()
    {
        Yii::$app->response->format = \yii\web\Response:: FORMAT_JSON;
        $hiscore = new Hiscores();
        $hiscore->scenario = Hiscores::SCENARIO_CREATE;
        $hiscore->attributes = yii::$app->request->post();

      	if($hiscore->validate()) {
          $hiscore->save();
        } else {
           return array('status'=>false,'data'=>$hiscore->getErrors(), 'post'=>yii::$app->request->post(), 'get'=>yii::$app->request->get() );
        }
    }

    public function actionApiGet() {
      $sql = "select id, name, score, datetime, ip from hiscores order by score desc";
      $result = Yii::$app->db->createCommand($sql)->queryAll();

      return json_encode(['data'=>$result]); // of json_encode([$result);
    }

    public function actionIndex()
      {
      ... // hieronder de standaard code
      ...
      ...
Active - inactive zetten van een object
Je wilt een onbect hidden maken of op een of andere manier uit zetten.
In de table maak je dan een extra kolom, bijvoorbeeld
actief, type boolean, default = 1
Dan pas je het model aan:
public function rules() {
  ...
  [['grade'], 'integer'],
 ...
public function attributelabels()
  ...
   'actief' => 'Actief'
Code in de standaard grid view index
[
'attribute'=>'actief',
'contentOptions' => ['style' => 'width:10px;'],
'format' => 'raw',
'value' => function ($data) {
$status = $data->actief ? '✔' : '10060';
return Html::a($status, ['/student/toggle-actief?id='.$data->id],['title'=> 'Toggle Status',]);
}
],Functie/method in controller
public function actionToggleActief($id) {
    // function toggles boolean actief
    $sql="update student set active=abs(active-1) where id = :id;";
    $params = array(':id'=> $id);
    Yii::$app->db->createCommand($sql)->bindValues($params)->execute();
    return $this->redirect(Yii::$app->request->referrer);
}
Laatset regel is een return naar de previous page. Dit zorgt ervoor dat de selectie in de grid view behouden blijft.
Cést tout!
Dynamic return page
In an update store referrer in Yii session and use it to return to when update is done.
// Store return URL, just before return to update view.
Yii::$app->user->returnUrl = Yii::$app->request->referrer;

// return to saved URL
$returnUrl = Yii::$app->user->returnUrl ?: ['/aaa/bbb', 'id' => $id]; // if not saved go to default
return $this->redirect($returnUrl);
Grouping rows in Gridview
Integrating collapsible groups with triangles in a Yii2 GridView requires a creative approach because GridView is primarily designed for flat data presentation. However, you can achieve this by manipulating the GridView and incorporating custom HTML and JavaScript for the collapsible functionality. Here’s a conceptual outline of how you might approach this:
Step 1: Prepare Your Data
Organize your data in a way that it can be grouped logically. Your data query should include the field(s) you intend to group by.
Step 2: Customize Gridview Rows
You'll use the beforeRow and afterRow properties of the GridView to inject custom HTML for group headers and footers. The group header will include the triangle and group title, and the group footer will serve as a marker for the end of a group.
PHP
echo GridView::widget([
'dataProvider' => $dataProvider,
'filterModel' => $searchModel,
'beforeRow' => function ($model, $key, $index, $grid) {
static $lastGroup = null;
$currentGroup = $model->groupAttribute; // Replace 'groupAttribute' with your actual attribute used for grouping
if ($lastGroup !== $currentGroup) {
$lastGroup = $currentGroup;
return "<tr class='group-header'><td colspan='5'>
<div class='group-title'><span class='triangle'>▾</span> {$currentGroup}
</div>
</td></tr>";
}
return null;
},
// Define your columns, and other GridView configurations here...
]);
Step 3: CSS for Styling
Add CSS for the group headers and the triangle icon. You can style the triangle to indicate collapsibility and use CSS transformations to change its orientation based on the group's collapsed state.
CSS
.group-header .triangle {
    cursor: pointer;
    display: inline-block;
    transition: transform 0.3s ease-in-out;
}

.group-header.collapsed .triangle {
    transform: rotate(-90deg); /* Pointing right when collapsed */
}

.group-content {
    display: none; /* Initially hide the content */
}
Step 4: JavaScript for Collapse/Expand Functionality
Use JavaScript to handle the click event on the group header, toggling the visibility of the group content and the orientation of the triangle icon.
JavaScript
$(document).on('click', '.group-header', function() {
    var header = $(this);
    header.toggleClass('collapsed');
    header.nextUntil('.group-header').toggle(); // This will show/hide the rows until the next group header
});
Step 5: Integration with Gridview
- Group Content: The actual rows of the
GridViewwill serve as the group content. They will be shown/hidden based on the header click. - Group Headers and Footers: These are custom rows injected into the
GridViewusingbeforeRow. There's no built-inafterRow, but you can simulate this by checking if the next row belongs to a different group or if it's the last row of the current group.
Caveats and Considerations
- Performance: With many rows and groups, the performance might be impacted, especially client-side due to the large DOM manipulation.
- Complexity: This solution adds a layer of complexity to your
GridViewrendering logic, so it's crucial to maintain clean and well-documented code. - Styling and Behavior: You might need to refine the CSS and JavaScript to fit the visual and functional requirements of your application.
This approach is a bit of a hack around the default GridView behavior, so it requires careful implementation and testing to ensure it works smoothly across different datasets and user interactions.