PageESP32-WROOM-32S 32d
Board description
The Dual Core 30pin ESP32-WROOM-32S 32d is compatible with the Arduino IDE. To get started, you'll need to install the ESP32 board definitions through the Arduino Board Manager. Here’s how:
-
Install the Board Package:
In the Arduino IDE, open File > Preferences and add the following URL to the “Additional Boards Manager URLs” field:https://dl.espressif.com/dl/package_esp32_index.json -
Use the Board Manager:
Go to Tools > Board > Boards Manager, search for “ESP32,” and install the package provided by Espressif. -
Select Your Board:
Once installed, select the appropriate ESP32 board from Tools > Board. Your Dual Core ESP32-WROOM-32S should appear in the list, allowing you to program it using the familiar Arduino environment.
With these steps, you can leverage the Arduino IDE to develop and upload code to your ESP32 board.
Modulenaam in Arduino IDE: ESP32 Dev Module
┌──────────────────────────────┐
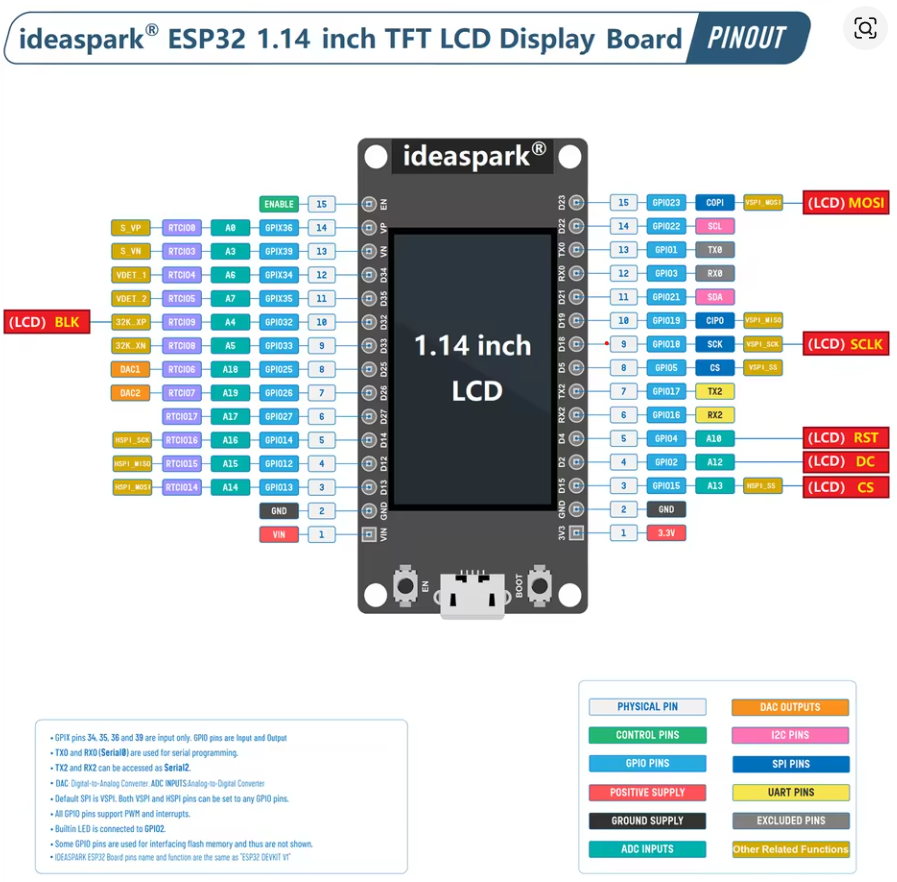
│ ideaspark® ESP32 Board │
│ 1.14" TFT LCD │
│ │
Left Side │ │ Right Side
───────────────┤ ├────────────────────────
EN (15) │ ENABLE (23) GPIO23 → LCD MOSI / VSPI MOSI
GPIO13 (14) │ A0 / RTC10 (22) GPIO22 → I2C SCL
GPIO12 (13) │ A1 / RTC9 (01) TX0 → USB Serial TX
GPIO27 (12) │ A2 / RTC17 (03) RX0 → USB Serial RX
GPIO33 (11) │ A3 / RTC8 (19) GPIO19 → VSPI MISO
GPIO32 (10) │ A4 / RTC9 (18) GPIO18 → LCD SCLK / VSPI SCK
GPIO35 (9) │ A5 / RTC6 (17) GPIO17 → TX2
GPIO34 (8) │ A6 / RTC4 (16) GPIO16 → RX2
GPIO39 (7) │ A7 / RTC3 (04) GPIO4 → LCD DC / A10
GPIO36 (6) │ A8 / RTC0 (00) GPIO0 → LCD RST
GPIO25 (5) │ DAC1 (15) GPIO15 → LCD CS / A13
GPIO26 (4) │ DAC2 (02) GPIO2 → Built-in LED
GPIO14 (3) │ A14 / HSPICLK (GND) GND → Ground
GPIO15 (2) │ A15 / HSPICS0 (3V3) 3.3V → Power Out
VIN (1) │ Power In (5V) ───────
GND (0) │ Ground
───────────────┤ ├────────────────────────
│ USB-C Port │
└──────────────────────────────┘