Fotobooth
Code voor Arduino
#include <Keyboard.h>

const int inputPin = 12; // Pin connected to Nayax output
int lastState = LOW;     // Previous state of the input pin

void setup() {
  pinMode(inputPin, INPUT);  // Set the pin as input
  Keyboard.begin();          // Initialize the keyboard emulation
  delay(5000);               // Delay to give time to connect the Arduino
}

void loop() {
  int currentState = digitalRead(inputPin);  // Read the Nayax signal

  // Check if the state has changed from LOW to HIGH
  if (currentState == HIGH && lastState == LOW) {
    Keyboard.press(0x20); // press space
    delay(100);
    Keyboard.releaseAll();  // Release the key
    delay(500);  // Debounce delay to prevent multiple triggers
  }

  lastState = currentState;  // Update the last state
}
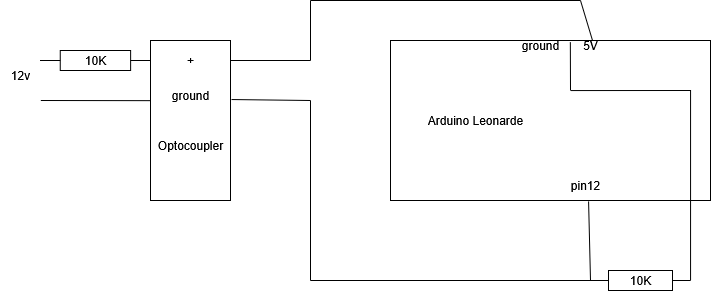
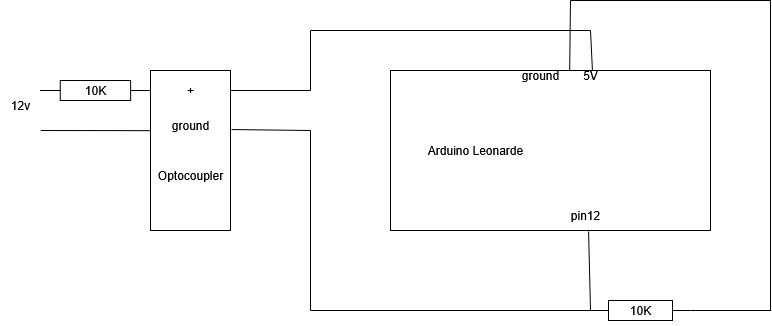
Aansluitschema


Arduino 5v - Optocoupler +
Arduino GRND - weerstand 10K - pin12
Arduino Pin 12 - GRND Optocoupler
Optocoupler primair 12 volt via 10K weerstand
Pin 12 wordt met een pull down weerstand laag (0) gehouden. De (1) is 5V wordt via de optocoupler verbonden aan pin12 als er een signaal via de optocoupler binnenkomt. De stroom die door de 10K weerstand loopt als de optocoupler 'aan' staat, is 0.5 mA (2.5 mW).
De 10K weerstand voor de 12v primaire kant v/d optocoupler is proefondervindelijk vastgesteld. Bij 12v en 10K weerstand staat er 5v op de primare ingang en werkt de optocoupler goed. Meer spanning (lager weerstand kan) volgens de specs maar is onnodig.
